
Tips to photograph wildlife in your woodland garden
Creating the right environment to be successful in the garden involves a lot of hard work. But, in the end, it pays off. It’s not luck that you saw an oriole, a fox or hummingbird in your garden. It’s the result of that hard work you put in earlier to create the right conditions.
Bridge camera is great choice for garden photography
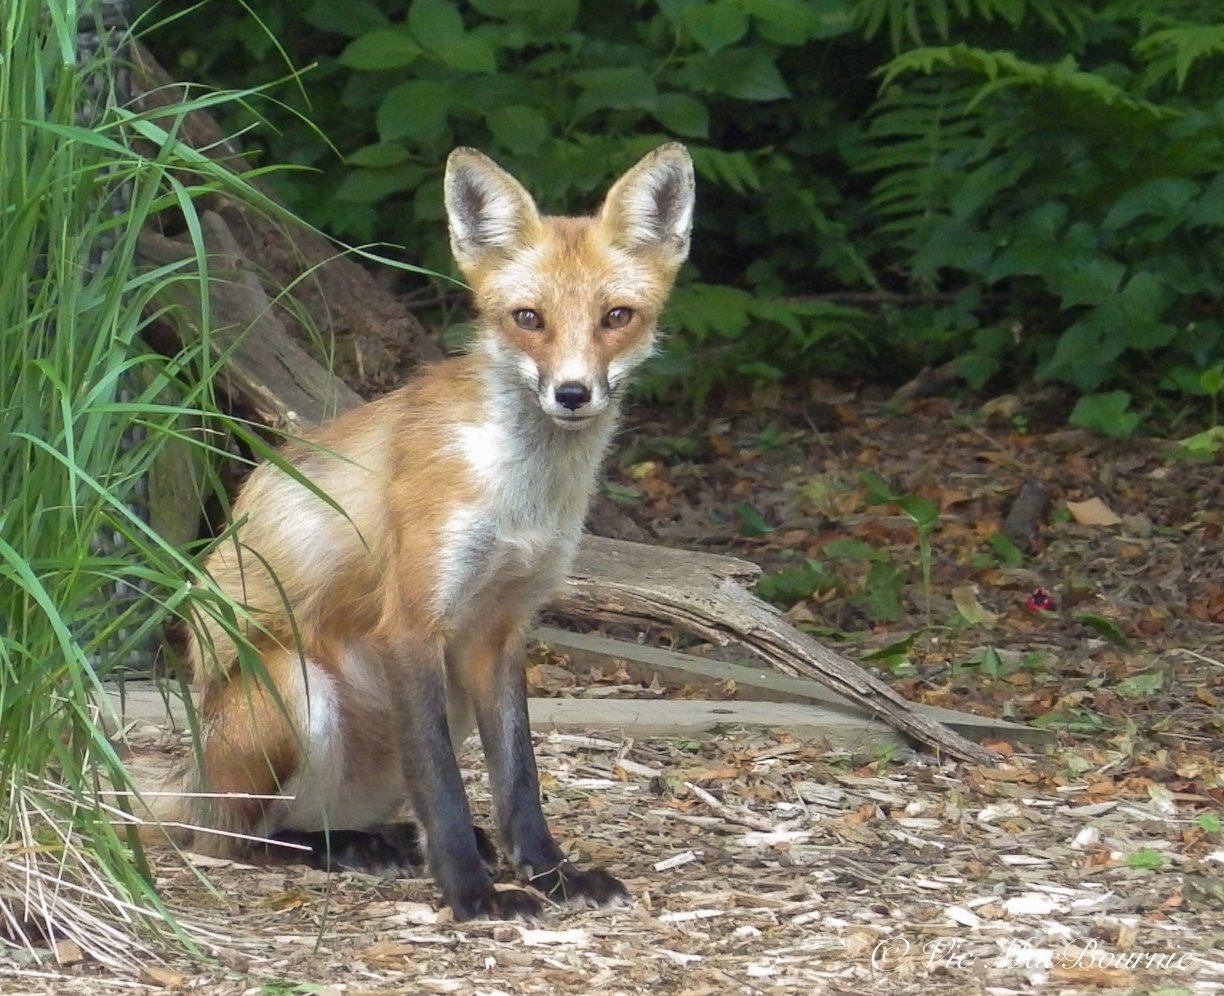
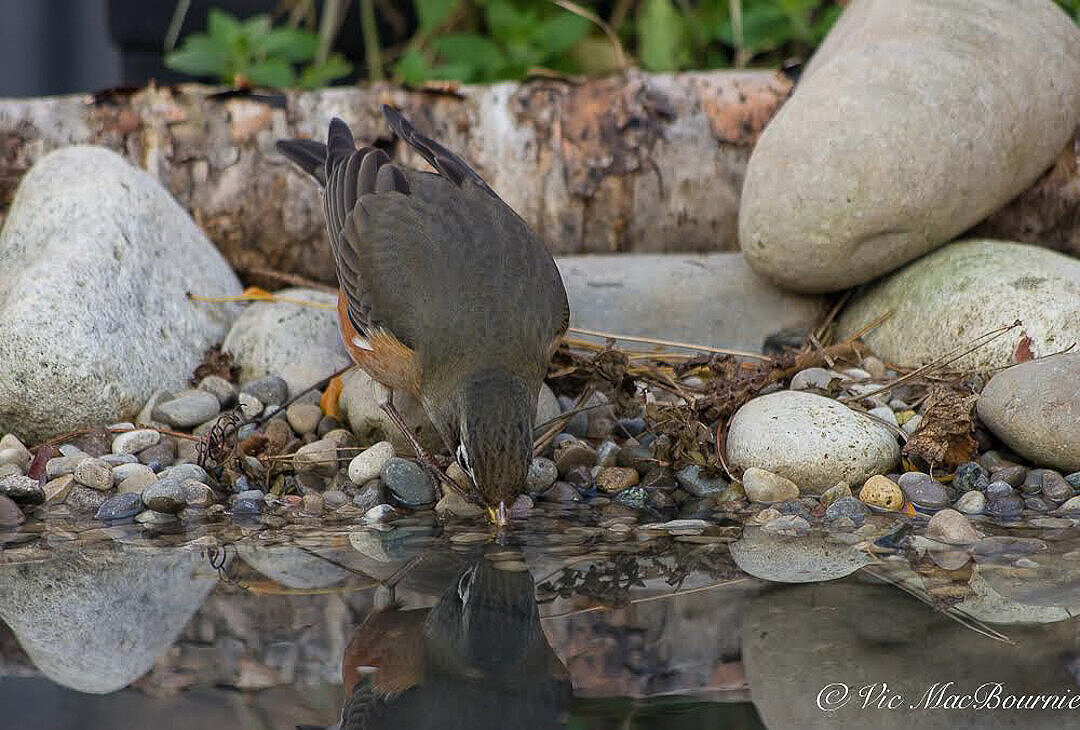
One of our neighbourhood foxes dropped in for its daily visit. It helped that I was armed with my camera on a monopod and my favourite lens.
This fox image is an example of how the right environment created an opportunity to capture an image that presented itself.
It began with a decision to work on getting a good image of a hummingbird feeding at a native Cardinal flower, but ended hours later with a memorable image of a fox.
Let me explain.
The cardinal flower was at its prime and I knew that, if I wanted to use it to get an image of a hummingbird feeding, I needed to act swiftly. So I set the camera on a tripod, filled up my coffee and waited.
(If you are interested in exploring garden photography at a higher level, be sure to check out my comprehensive post on the Best camera and lens for Garden Photography.)
If you are looking for a new camera or lens, check out B&H Cameras & Video for a complete line of cameras and lenses.
And, if you are wondering how a point-and-shoot digital camera that’s more than 10 years old can perform in the garden, be sure to check out my post on the Canon PowerShot Elph 500 HS.
The hummers came to the feeders surrounding the Cardinal flowers but only stopped at the flowers three times for a brief moment.
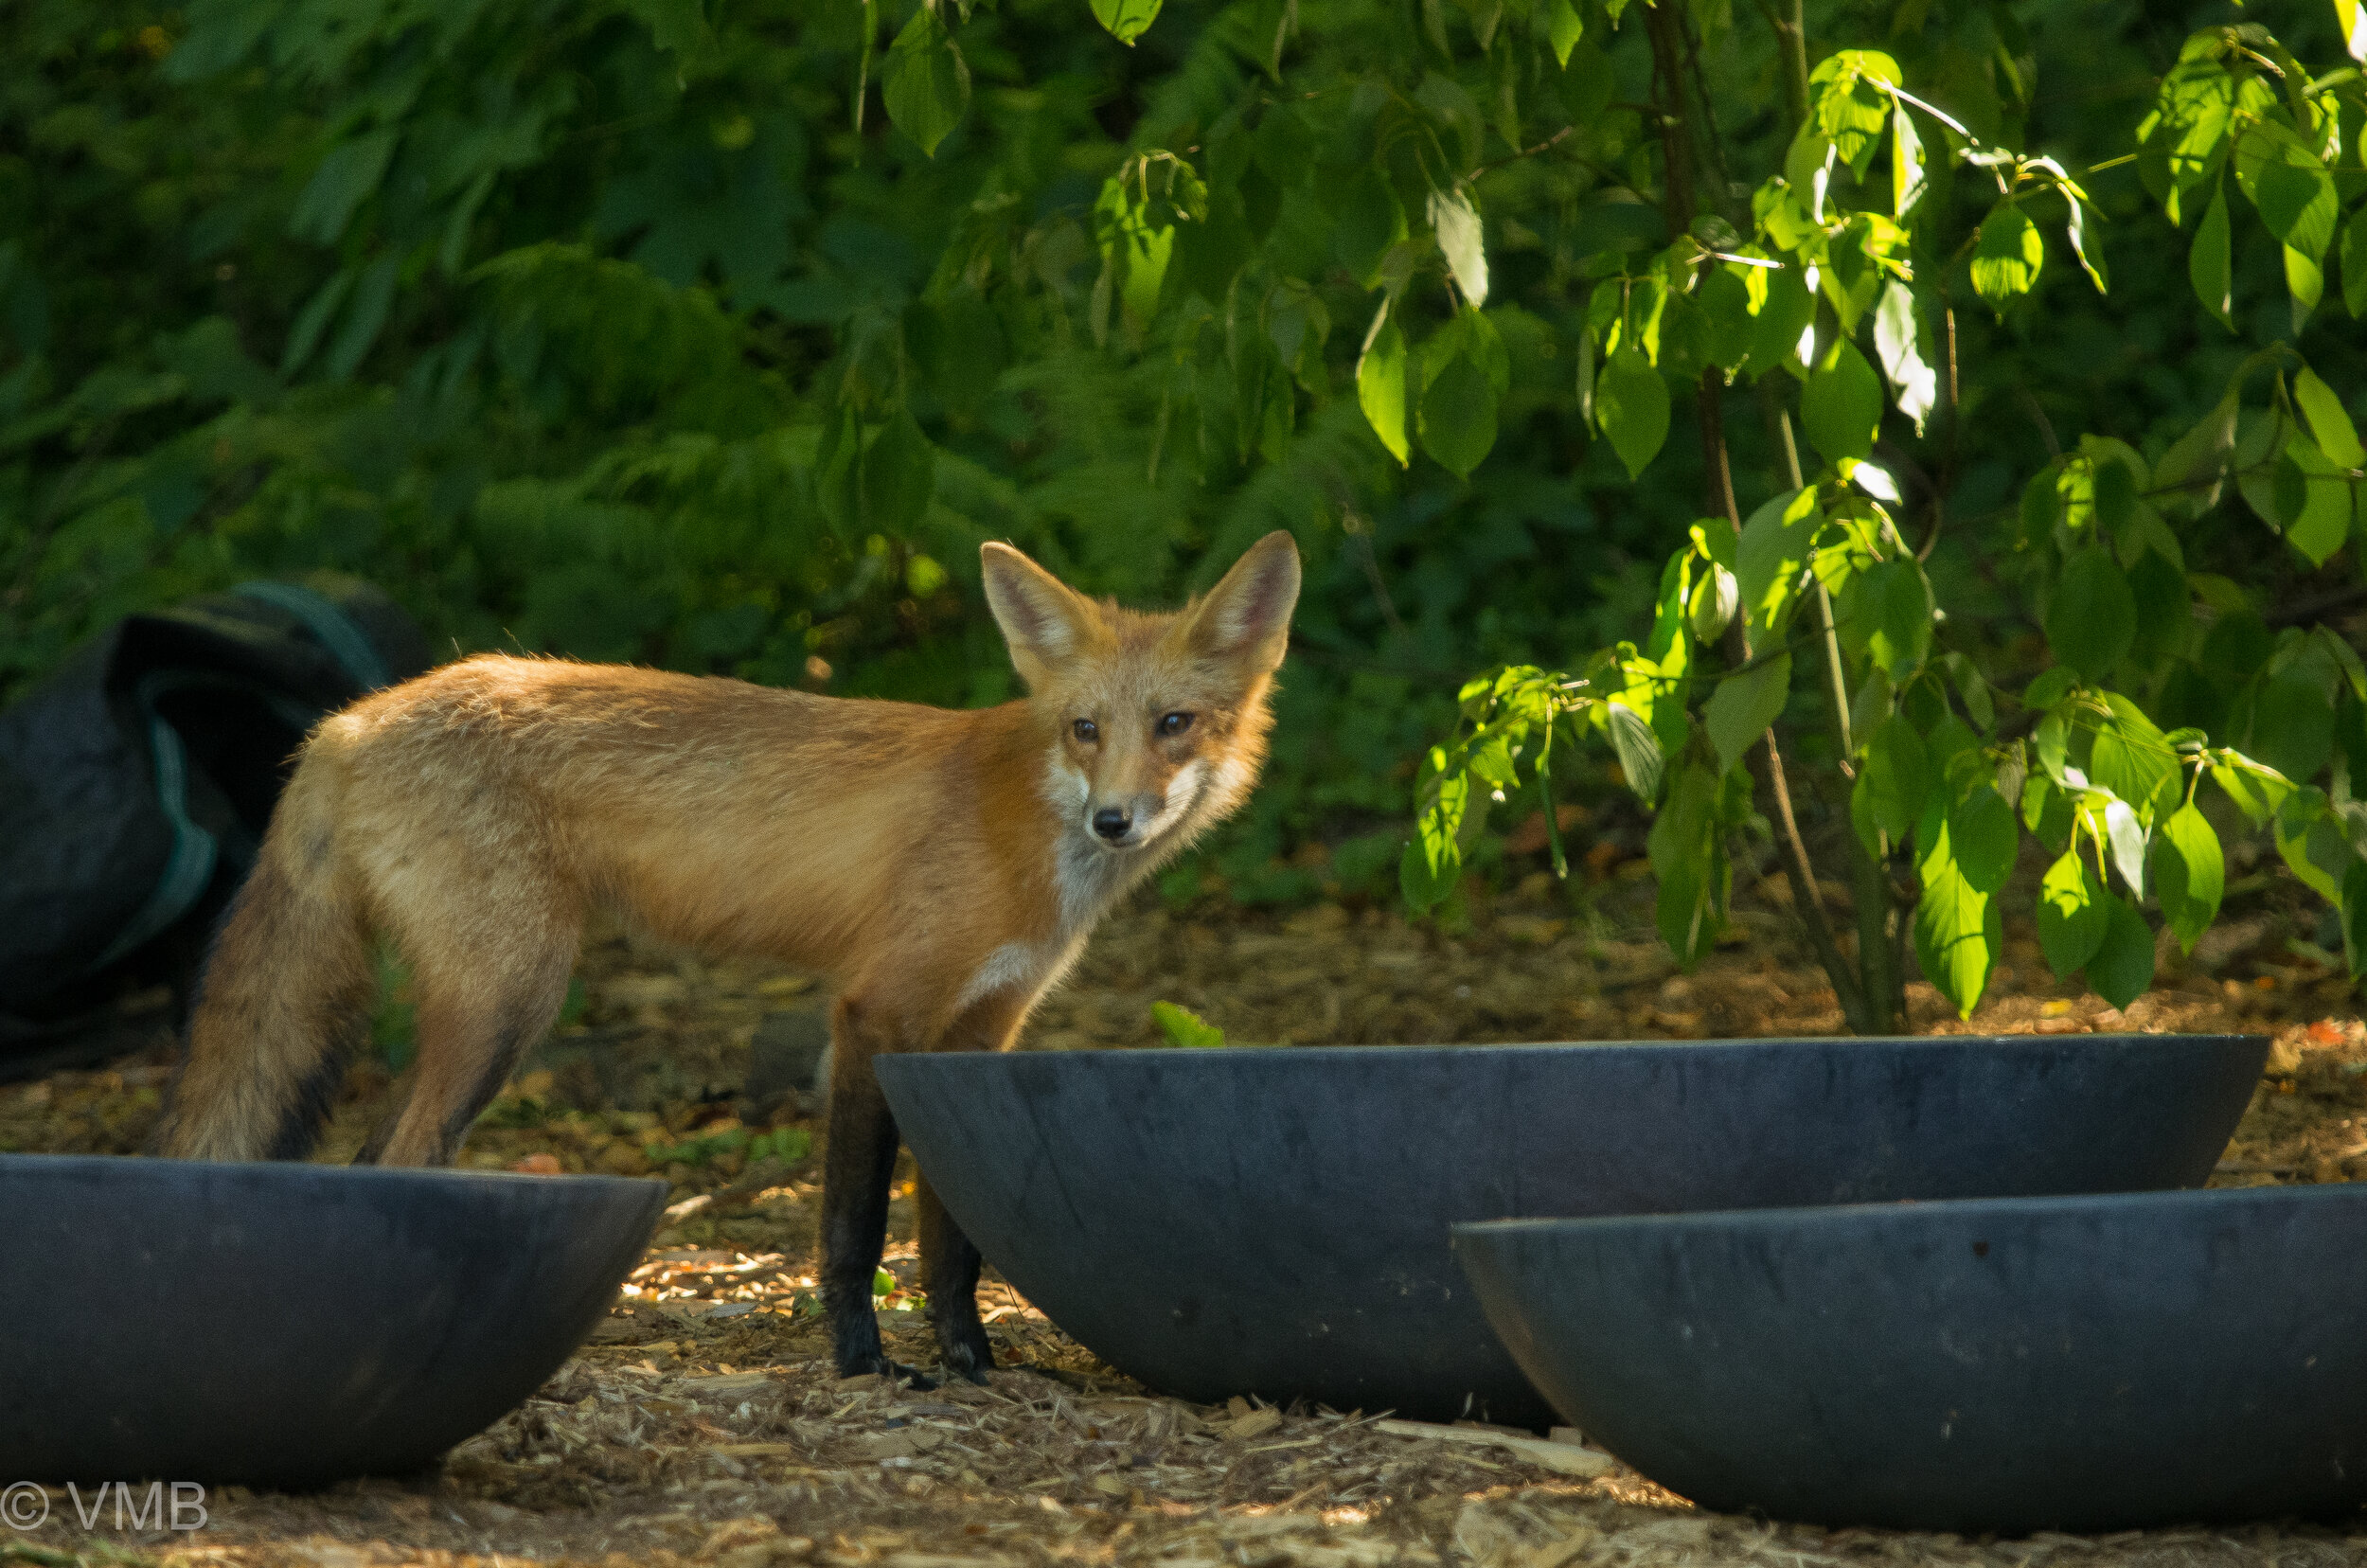
About three hours into the shoot, I noticed a fox standing by our shed looking my way. It was by no means stressed by my presence. In fact, it seemed perfectly happy to share the yard with me provided we stayed at a comfortable distance.
How often have you been in the yard and a great photographic opportunity presented itself to you? Too often, we are not prepared. Chances are, all we have is our smart phone by our side and the resulting image is nothing but a poor replica of a memorable moment.

The Pentax X5 and other bridge cameras from major manufacturers allow the photographer to be ready when the opportunity arises. I was sitting out in the garden when this fawn decided to visit. The 580mm reach on the Pentax X5 allowed me to get in close without scaring the little fawn.
But on this day I was in luck. The camera was already set up with my favourite 300mm F4.5 lens on a monopod.
I couldn’t ask for a better situation. Even our dog Holly had yet to notice the fox that trotted over to our three large water bowls and helped herself to a long drink.
A few quick bursts of photos from the 35mm DSLR camera and off she went. Like a ghost. There one moment … the next, gone. It was over as quickly as it began.
The lesson learned was simple: Be prepared.
Today, even if I just go out to enjoy my morning coffee, I always have a camera by my side ready for action. Sometimes it’s a simple “Travel camera” (read my travel camera review here) with a wide angle to short telephoto lens that is great for basic garden shots but will not likely get you close enough to most wildlife.
If you are looking to upgrade your camera equipment – be it a new camera body or lens – be sure to check out KEH Camera Exchange for the best prices on excellent used equipment. You can also trade in your used gear to help curtail the cost of new equipment.
This Carolina Wren was photographed with the Pentax X5 Bridge camera that comes equipped with a super telephoto lens capable of shooting wide angle images as well as telephoto shots and even close-up macro type images.
Most likely, it is my versatile “Bridge camera” that allows me to shoot everything from long telephoto images of wildlife, including birds and butterflies, to sweeping wide-angle garden vistas, to macro shots of flowers and insects.
On this day, I happened to have my 300mm lens on the camera and ready to go, which made capturing the fox image possible.

This young fox decided to pose for me for a minute giving me time to focus the Pentax X5 “Bridge” camera to capture the image. I needed to use the full zoom power of the X5 (500mm) to capture the image.
More recently, however, I have a “bridge camera” with me. I have used the camera for more than a year now and have come to appreciate its versatility, with its ability to go from extreme telephoto to wide angle and even a very usable macro mode.

Bridge cameras, which are offered by all the major camera manufacturers, can be the perfect camera choice for garden photographers looking for a single extremely versatile camera that is at home photographing garden vistas as it is birds and other wildlife. Add to that versatility the ability to get in close to flowers for macro photography and it’s hard to believe that everyone is not lining up to purchase one. These cameras can be described as mid-priced cameras situated between a simple point-and-shoot and a more serious 35mm SLR with a complete line of lenses. Bridge cameras look like a typical digital single lens reflex (DSLR), but without the interchangeable lenses.
The bridge camera offers a built-in lens sporting a wide angle to long telephoto lens. The combination creates an easy-to-carry-around versatile camera that can deliver very good results with a little practise.
But they are not by any means perfect.
My bridge camera uses an electronic viewfinder in addition to the back LCD screen to view the image. The electronic viewfinder takes getting used to and falls far short of a optical viewfinder found in traditional DSLRs. To add to the difficulty of using the Bridge camera is a significant “shutter lag” meaning an excessive amount of time between when you press the button to take the image and the time it is actually taken. This shutter lag can mean the difference between getting the shot and missing it entirely.
In addition, because most of these cameras are so dependent on electronic viewfinders and the electronic zooming of the lens, some of these cameras tend to exhaust your batteries quickly, especially if you use the large back LCD screen as your primary viewer or to check your images regularly. My camera uses regular AAA batteries, which can be convenient when you are travelling, but compared to rechargeable batteries, can also be expensive to use. The other issue I have with the Pentax (which is no longer available) is the fact I cannot easily add filters to the front of the lens. This may not be a problem for most photographs, unless of course, you need to use a polarizing filter to remove glare from leaves or a pond.
Like most Bridge cameras, the Pentax X-5 bridge camera that I am using came with a very long 26X telephoto lens (the equivalent zoom for traditional 35mm cameras of about 22-580mm.) Most bridge cameras come equipped with a lens that provides the photographer with both a solid wide angle lens as well as a super-long telephoto lens.
This image taken with the Bridge Camera is an example of the type of images that are possible just sitting in the backyard waiting for the right opportunity.
Bridge cameras like my Pentax X-5 also come equipped with an impressive macro feature making it the perfect camera to carry with me into the garden for casual macro shots. For more serious macro photography, I will mount a 50mm or 100mm dedicated macro lens on a 35mm SLR camera.
Being prepared, having the right tools at hand and, of course, some luck on your side can mean the difference between getting the shot and missing it.
Even seeing wildlife, let alone getting good photos of them, depends on a lot of factors going your way.
Luck certainly plays a role in any shot, but I like to think that it plays a smaller role than most people think.

A macro image of a clematis taken by the Pentax Bridge camera the X5, on macro mode. This shows the versatility of the camera and its lens that is able to go from long telephoto (see above image of the Fox) to extreme macro without changing the lens.
Being out in the yard for more than four hours patiently waiting for the hummingbirds to cooperate creates the opportunity to be successful. Still, I was unsuccessful getting that shot of the hummingbird. Instead, I had to “settle” for the fox shot.
I like to think you create your own luck.
Setting out large water bowls meant to provide local wildlife with a fresh water source helped create that opportunity for the photograph.
Creating a natural garden, providing a source of natural food and moving water in the form of bubbling rocks and fountains, not using pesticides, having woodpiles … these all provide the right environment to getting the photograph, or the opportunity to observe the wildlife that call our property home.
PopPhoto website lists their favourite Bridge Cameras in this informative article starting with the best overall camera going to the Sony Cyber-shot DSC-RX10 IV, the Canon PowerShot SX70 HS as the best Wildlife camera and the Panasonic Lumix FZ80 as the best budget camera.
It doesn’t have to be a fox. It could have been a bird, a butterfly a reptile, or even a photograph of a beautiful tree or grouping of flowers.
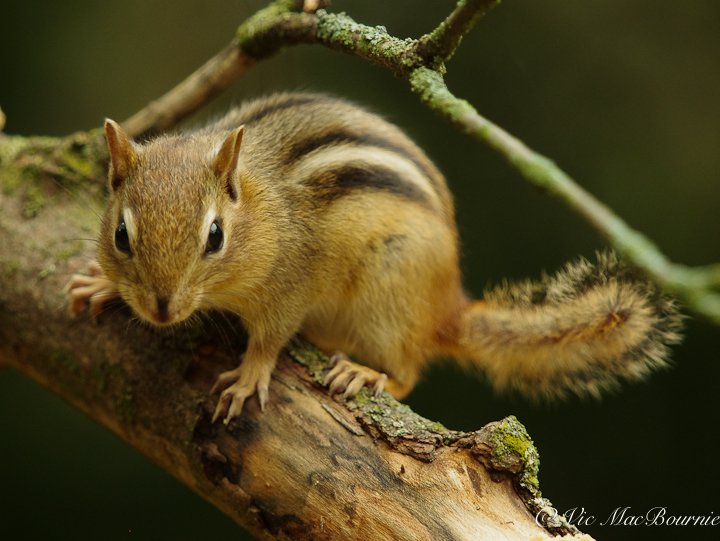
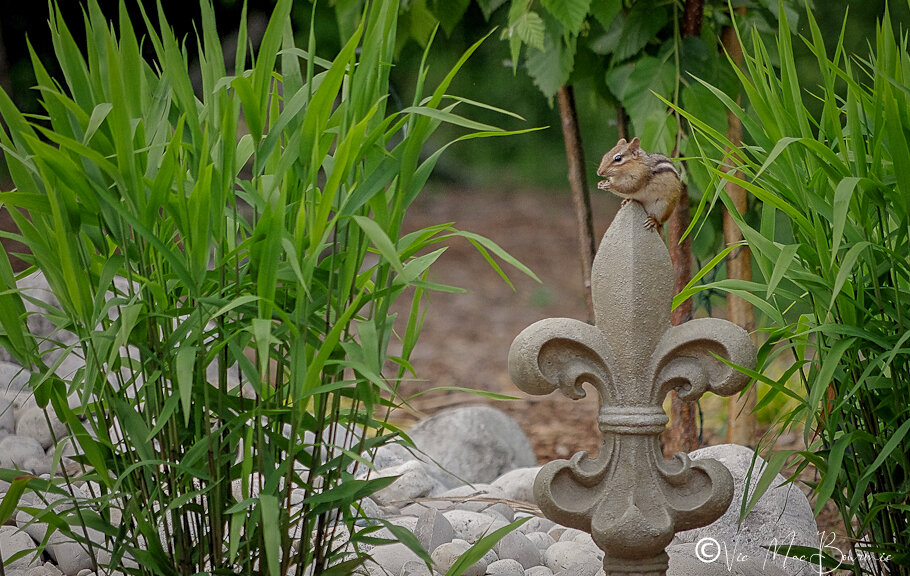
The day before this shot was taken, I was trying to capture some photographs of birds enjoying my new solar-powered fountain, when a little chipmunk decided to hang out with me for a while. So I got “lucky” and was able to get some great shots of the chipmunk too.
Getting lucky is really about creating the right environment to get photographic opportunities and then taking advantage of these opportunities.
It’s the same in your everyday life. Put yourself in the best environment to succeed and chances are you will.
Getting up early, spending time in our gardens, getting up close and intimate with flowers. These all create the opportunities to be successful.
I’ll be out again soon working on getting the shot of the hummingbird at the cardinal flower. Maybe I’ll get “lucky” and the hummer will cooperate this time.
This page contains affiliate links. If you purchase a product through one of them, I will receive a commission (at no additional cost to you) I try to only endorse products I have either used, have complete confidence in, or have experience with the manufacturer. Thank you for your support. This blog would not be possible without your continued support.

Create your own custom garden photography book: Ten simple steps
Creating a custom photo book of your garden is not only simple, it’s an enjoyable and extremely creative process. By creating a garden book each year, you can document its yearly growth in a series of beautiful books of your own photography. The customized books from Mixbook are also great ways to document memorable vacations, or a year in the life of your children or grandchildren.
Mixbook: Focus on my favourite photo book creator
I am hoping this article will plant the seed for readers to dig into their digital images and treat themselves to the best gift ever – a beautifully bound custom photographic memory of their gardens.
Creating a custom photo book featuring images from our gardens could not be easier, more rewarding or satisfying. And don’t be surprised if it also awakens your creative juices inspiring more photo books documenting other areas in your life – vacations, children, grandchildren… the possibilities are endless.
Online book publishers are everywhere and the good ones, including my personal favourite Mixbook, have gone to great lengths to make the creation of a high-quality photo book using your digital images extremely simple for even the most novice of computer users. If you can click a few buttons to upload your images to a website, you can create a beautiful memory of your garden. You can even let the online software place all your images onto the pages, making the process as simple as possible.
Looking for a great camera to photograph your garden? Check out my extensive review after using the Fujifilm X10 after ten years.
(If you are interested in exploring garden photography at a higher level, be sure to check out my comprehensive post on the Best camera and lens for Garden Photography.)

Turning your garden and wildlife images into a memorable garden book is not only a rewarding experience but a creative one as well.
Ten steps to create a custom garden photo book
Gather existing digital photos of your garden, or, if you have not been documenting your garden, begin taking photos on a regular basis throughout the seasons for a future book
Organize the images in a single folder or divide them into 12 separate folders – one for each month.
Optimize the images you want to use in the book in a photo editing program
Save the images as large files –preferably in the neighbourhood of 5-10 megabytes or larger. These large files allow you to use the images as full 8X12 pictures without losing quality when they are printed.
Log on to the website and upload your images.
Drag and Drop the images on the template you have chosen. It’s helpful to have both vertical and horizontal images to choose from. Once they are on the page, make any needed adjustments to the photographs
Fill all the remaining photographic boxes on the pages and write headlines and/or captions of the photos if you want.
Add more pages if necessary.
Finalize mailing address and payment requirements
Now sit back and wait approximately two weeks for delivery of your garden book.

A screenshot of the Contemporary White template I chose to create my Woodland/Wildlife custom photo book.
I know these photo books have been around for quite some time, but I suspect many people have put off creating one for a myriad of reasons. Wedding photographers have used these photo books for years as a replacement for the traditional wedding album as well as a convenient way to show potential clients their portfolios.
I want to plant the idea in gardeners’ heads that these photo books are excellent resources that we really need to use to our advantage. So, it’s time for gardeners to dig their hands deep into the digital dirt, get their photos organized and begin putting their books together. And what better time than over the winter months to create a memory of the previous year’s garden.

The first page of my custom Woodland/Wildlife custom photo book from Photobook Worldwide.
The making of my Woodland/Wildlife Garden book
Recently, I created my own garden coffee table book made up primarily of garden and wildlife images taken this year in the Woodland/Wildlife garden.
I only wish I had done this years ago, so I could look back and trace the annual growth of our garden. My plan now is to create a garden book on a yearly basis not only to monitor the changing face of the garden and its visitors, but to document annual highlights so I can use it as a visual resource to easily recreate successful plant combinations.
For years, I put off exploring the many companies offering to print your photographs in book form. In fact, the garden book is the second photo book I recently completed. The first was created as a Christmas gift for my daughter using her digital images of the Tokyo Olympics, where she attended to work with the Canadian Olympic team. The book, full of her Olympic moments, is the best souvenir she could hope for of her trip. We plan to do another for the upcoming Beijing Winter Games in China.
But, back to my gardening book.

One of many spreads in the custom photo book.
The result: I could not be happier with the finished book and the price. This will become a book I will treasure and one that will take its rightful place as the main act on our coffee table.
Technology has made these professional looking books not only incredibly easy to create even for beginners, but exceptionally inexpensive for a one-off printing.
By inexpensive, I mean cheaper than getting similar sized photographic images printed at your local photo shop.
Using a discount code, I recently created a hardcover, 36-page, 8.5-inch by 12-inch book with 110 of my favourite garden images for just over $50 Canadian. Many of the images were full-page bleeds that covered the entire 8” by 12” page.
For the price of an inexpensive dinner out with your partner, a small selection of annual or perennial plants, even a single high-priced shrub, you can produce an outstanding memory of your garden and the wildlife that call it home.
If you don’t use your camera often in the garden, the book will inspire you to get out more often to capture images.
The book could be a one-time event or even a yearly endeavour used like a tool to document the changing nature of your garden and the fauna that live in it.
What better way to document the plant combinations that worked so well together, or, where exactly the 150 bulbs that you planted last year are located.
You don’t need a fancy camera, your smartphone is more than capable of getting high-quality photos for the book. My book is a combination of images taken with a host of cameras and lenses from expensive DSLRs with telephoto lenses for the bird images and wildlife, to simple point-and-shoot cameras and images captured on my smartphone.

One of several templated pages showing multiple images.
How easy was it to create the garden photo book?
After much research into various companies that create these photo books, I chose Mixedbook.
The company’s list of recognitions and awards is impressive – New York Times, techrader, Good Housekeeping and Digital Camera World all give it awards for Best Photo Book Service, and c|net recognizes it for Easiest software to use.
I don’t know how the folks at Mixedbook could make it any easier.
That’s not to say that creating a beautiful photo book does not involve putting in some work to prepare for the project.
Just gathering my best photographs into a digital folder took more than a little effort. But, I’m sure many readers are much more organized than I am and would be able to organize their images much easier than me.

Although the entire book is templated, changing the templates to suit your images is easily done.
Once I got the images into a single folder, I imported them into Adobe Lightroom where they were all edited for proper exposure. Some were cropped and others took a little more work to enhance the colours etc. I happen to use Lightroom, but any photo editing software will get the job done.
In fact, if you are careful when you shoot the images, and you are not too worried about the quality, you could skip the editing process entirely.
At this stage, all you do is log onto the Photobook website, pick a book template you like from the many available and upload your images.
Once the images are uploaded to the site, you can either begin to drag-and-drop them on the various pages or allow the computer to populate the pages for you.
You can add descriptions under all or just a few of the images if you like. Add stickers if you are doing a fun book or one for your children or grandchildren.
If you need more pages, you can add them two at a time for a small additional cost.
Before you complete the purchase, ensure that any discounts are applied before pressing complete, but if you do complete the purchase, you have a half hour to change your order.
When I created my book, I recognized that I did not get the 50 per cent discount and quickly texted the support line. They were extremely helpful and guided me to the location where I made the proper changes to ensure the discounted price.
I was very impressed with the service.
Once completed, it’s as simple as adding your mailing information and paying with a credit card.
Press complete and your finished book will likely be delivered in less than two weeks.
In conclusion
If you are like me and have put off creating a photo book, don’t procrastinate any longer. They really are exceptional keepsakes of your garden, favourite vacation or a year in the life of your children or grandchildren.
The print quality is exceptional. The Photo book’s binding for my hardcover book proved to be very professional, and the quality of paper is very impressive (upgraded paper is available). Without the discount, my cost would have been more than $100.00 Canadian, which I would consider good value. The discount made it an outstanding value and there are discounts available throughout the year.
If you currently do not have images to create a book right now, make a promise to yourself to begin regularly photographing your garden so that you will have plenty of images for a future book.
Trail camera turns garden photography into backyard safari
The Wingscapes BirdCam Pro is a unique Trail Camera that allows extremely close focus to capture birds and mammals at feeders, birdbaths, bird houses and in the garden. Trail cameras, originally designed for hunters, are now becoming popular for homeowners and gardeners wanting to document the wildlife in their backyards.
Wingscape models capture birds and mammals up close
It’s like a baby cam but instead of keeping an eye and ear out for a little one, it watches over your backyard for wildlife wandering through your garden.
For anyone who wants to know what is passing through or hanging out in their backyard night and day, one of the popular trail cameras is essential.
Trail cameras for home security and to document backyard wildlife
Woodland/wildlife gardeners may not know too much about these popular cameras, originally designed to allow hunters to document the wildlife using a particular trail out in the field.
While they continue to be a tool for hunters, more and more the cameras are finding their way into backyards not only to document the wildlife that are using the yard throughout the day and, especially, throughout the night, but also to act as a security camera to capture any potential security threats in the backyard.
Place one on your deck, for example, for security and to monitor wildlife. Realize, however, unless they are secured, they can be stolen or the digital cards removed by knowledgeable thieves. They will also put out light to capture images and video. Animals are not bothered by the lights but humans will notice it.
(If you are interested in exploring garden photography at a higher level, be sure to check out my comprehensive post on the Best camera and lens for Garden Photography.)

The benefit of the Wingscape Bird and Trail camera (pictured above) is that you can get up close and personal with backyard wildlife.
For more suggestions and some of my favourite garden things, be sure to check out my Favourite Things post.
Quality and features of the cameras and images vary widely, but most capture high-quality images and video both night and day. Some of the higher-end models even send the images to your smart phone to allow you real-time monitoring of the camera.
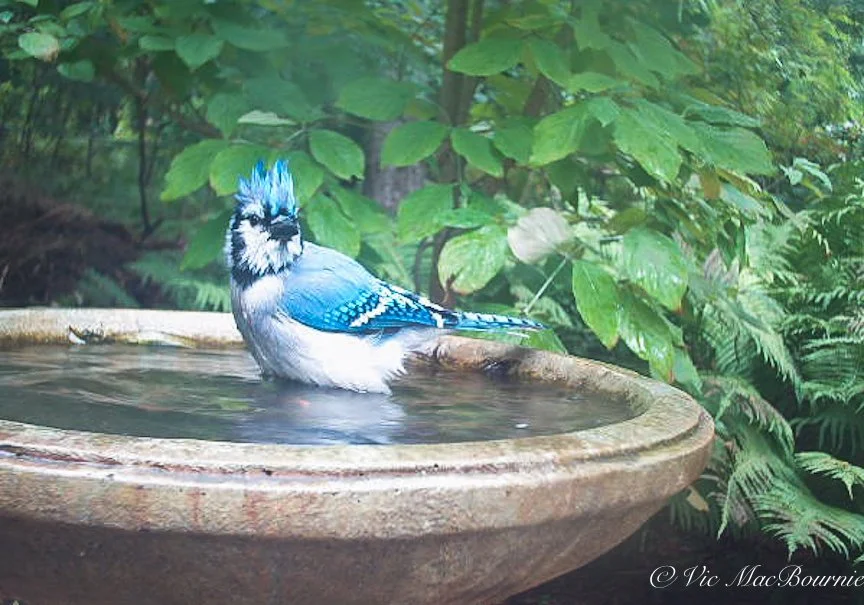
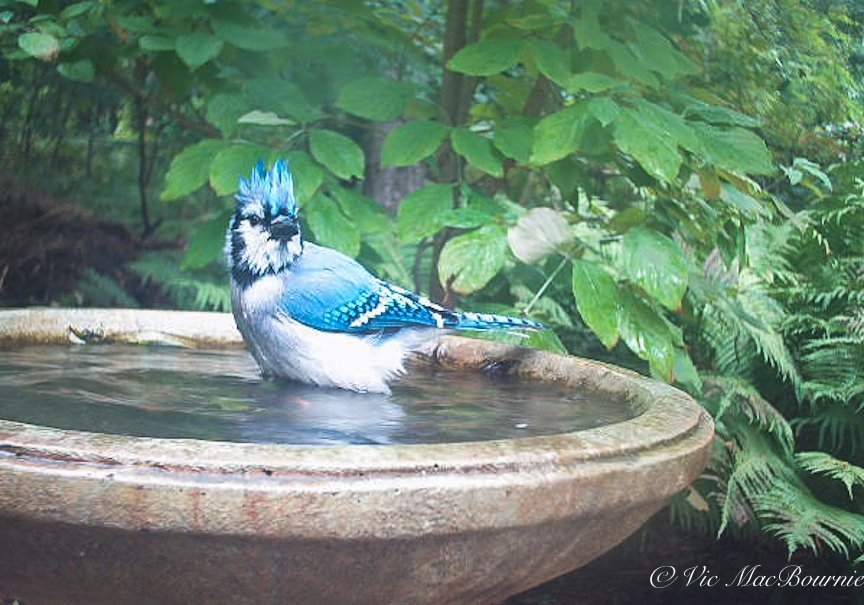
This photo of a Blue Jay at the bird bath was captured by the specialized bird camera. Imagine if it was a more rare bird or even a raptor that visited?
I’m not here to give readers a review of the best and worst trail cameras because I don’t own them all. I will, however, provide readers with some of the better cameras recommended by those who have tested the various models and tell you about my experience with my hybrid trail/bird camera.
Top five trail cameras from Bestreviews.guide
My hope is that this article simply introduces Woodland/wildlife gardeners to the possibilities these cameras offer them.
(I was fortunate enough to purchase a highly specialized trail camera (the Wingscapes BirdCam Pro) designed to capture birds and other wildlife images up close. More on that later in the article.)

Blue Jay at the BirdCam. The trail camera can be set up to show date and time, helpful if you are documenting times that wildlife appear.
Back to the Trail cameras. The cameras, that primarily run off of batteries, are meant to be left out in the field for months on a trail through any type of weather documenting the wildlife in the area. Some are available with supplementary solar power panels to give batteries a longer life, others use solar powered batteries to keep them going in the field for months. Most come with straps and other methods of attaching them to trees. They also have tripod attachments that enable the cameras to be used with a tripod or device that uses tripod-style attachments.
Woodland/wildlife gardeners can mount them to a tree, a pole or just place them on a tripod and move them around the yard to capture the fox, the skunk maybe the coyote or deer that you suspect are wandering through your yard while you sleep. Unlike hunters who have to worry about the expensive cameras possibly being stolen or damaged out in the field, gardeners can leave the camera out without any real fears of the camera being stolen or damaged.
If you are lucky enough to have a den in the yard, set the camera up near the den to document the life of your new little neighbours. Maybe you will be lucky enough to capture the babies as they emerge into the world and discover your garden.
The possibilities are endless.

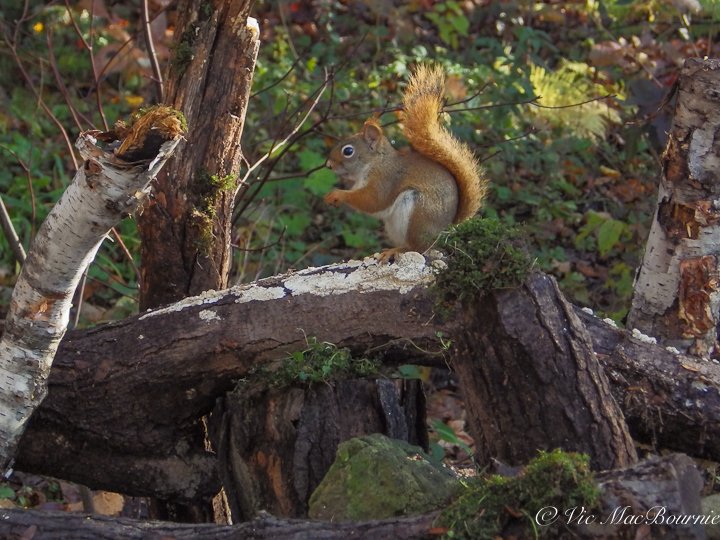
The BirdCam is perfect to use at an outdoor photo studio that is specifically set up to photograph wildlife. Here a red squirrel is photographed up close and personal.
If you are still curious about what these trail cameras are capable of, check out a few of the thousands of Youtube videos that have been put up from all corners of the earth. My favourites are videos documenting wildlife in national parks ranging from the Florida Everglades to videos from Algonquin Park in Northern Ontario, Canada. Here is a good one from a small watering hole in Arizona.

This deer was caught on our trail camera in the middle of the night. These cameras are a great way to monitor what animals are roaming your property at night.
A few months ago I decided I needed a trailcam after watching our neighbourhood fox regularly wander through the yard. I have seen several deer, racoons and a few possums, but I suspected we probably had more wildlife visitors than I realized, including the odd coyote.

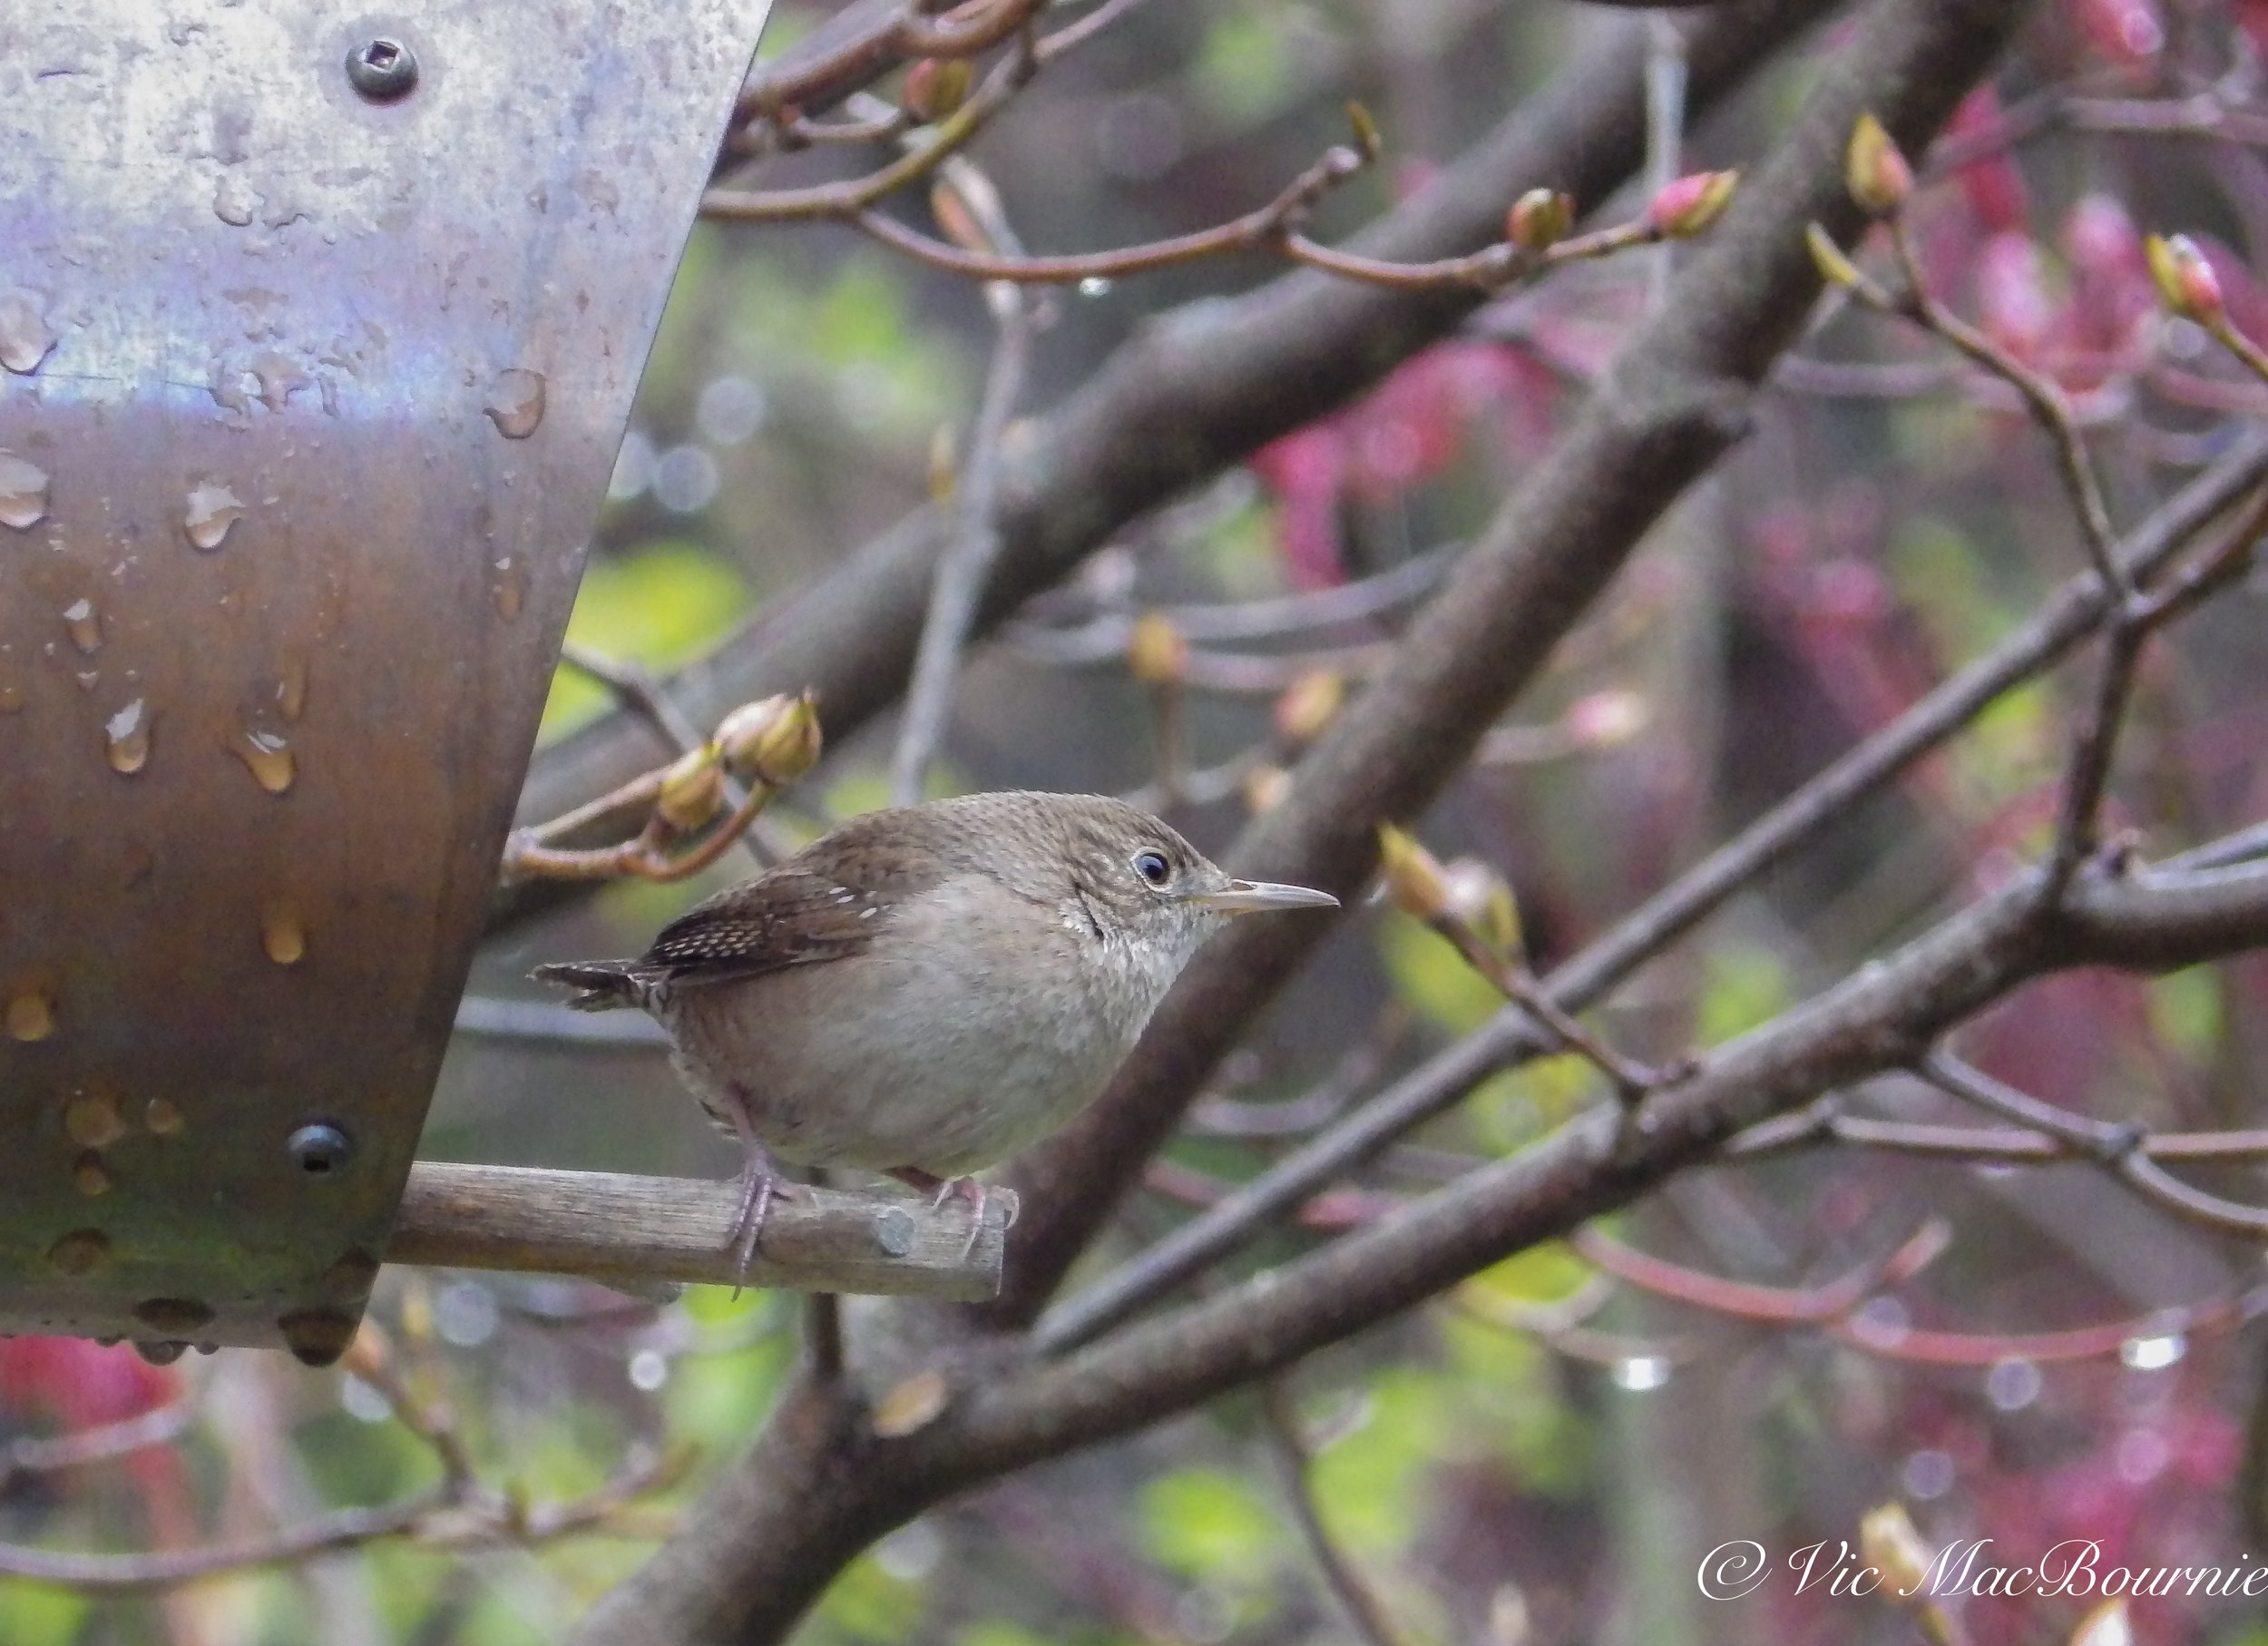
Another image of a wren caught on the BirdCam Pro at the birdbath.
The Wingscapes BirdCam Pro a hybrid trail camera
Regular visits to Kijiji where there are always several used trailcam models of varying quality and price points available, led me to the Wingscapes BirdCam Pro.
Although it can operate as a regular trail camera, the Wingscapes BirdCam Pro has the ability to focus very closely to capture birds and wildlife up close – very close – like 6-inches to infinity.

Trail cameras are a great way to see what animals are roaming your gardens at night. Here, a friendly skunk skitters across the frame in front of the camera. Night images are not always the best but they can be used to verify what animals are in the yard.
The BirdCam Pro is a weatherproof, motion-activated with an 8MP camera that includes an adjustable flash for nighttime photos and videos. It also includes a timelapse setting for recording non-animal subjectslike weather and plants emerging from bud over a period of time. It also features a 2-inch color preview screen and can also send images directly to your computer with an optional Wi-Fi SD card. Here is the bad new, the item is discontinued from Moultrie. The good news is that a later version is still available. (see below).
Traditional Trail cameras are not really designed to capture images or video that close to the camera. Most are simply trying to capture larger wildlife (deer, bears, moose) from a distance of 10-20 feet or more. They do an excellent job capturing these images.
Birdwatching Bliss, another blog site did an extensive comparison between the Wingscapes BirdCam and traditional trail cameras. You can read the full review here.
The Wingscape BirdCam Pro (which is no longer available from Moultrie) has the ability to manually focus the wideangle lens to capture small birds up close, for example, at a feeder or on a birdbath. Although this model is no longer available (I purchased mine from Kijiji used but in an unopened box), another later version, the Time Lapse Pro is still available, at least on Amazon. It may also be available at specialty stores. The Wingscapes TimelapseCam Pro produces 20MP pictures, has a focus range from 6 inches to infinity and a flash range to 25 feet. It also shoots HD video at 1080P with sound.
It’s important to note the the TimelapseCam Pro lacks the motion sensor that enables you to capture birds or animals that move into the scene. The Timelapse model, therefore, is of less value to those hoping to capture images of wildlife. It can be set up near a feeder or bird bath and programmed to take an image every 15 seconds for example. This would leave you with a lot of empty images.
I would recommend looking for a used BirdCam Pro model.
My BirdCam Pro has caught images and video of wildlife and birds in the backyard, including the video of a bluejay at one of my bird baths featured on this page.
I often set it up in the morning at one of my bird baths and let it to its thing for the entire day. Earlier this year I was able to catch a surprising image. I usually have several families of Baltimore Orioles living in and around our garden and visiting regularly, but this year none stayed around past a few days in the spring. I was convinced that none were around until I checked my SD card following a day of shooting at the bird bath.
Sure enough, a young oriole was photographed at the birdbath. It told me that at least they were still around.
In one evening it caught video of two skunks, a racoon and a possum at my woodpile. It’s night video capture is only B&W and not always publishable because of uneven lighting, but it does give you a good indication of the wildlife in your backyard.
Newer trail cameras are more than able to capture high quality video in B&W.
Wingscapes AutoFeeder for the birds
Related to the Wingscapes BirdCam is another interesting tool for bird lovers. The Wingscapes WSBF02-00132 AutoFeeder, is an automatic bird feeder that spills out a set amount of bird feeder at the same time of day. The battery operated digital timer can program up to 4 feed times a day, releasing food from its 1-gallon seed hopper from 1 to 10 seconds each feeding.
In conclusion
Trail cameras have been used for years by hunters and have only recently been discovered by homeowners, gardeners and wildlife lovers as a way to track what lives or passes through their gardens.
Besides the fun of downloading your SD card to see what visited over night, the cameras are a great resource to chart the different animals as well as learn about their movements. As a wildlife photographer, learning that the neighbourhood fox trots through the yard every morning between 6 a.m. and 7a.m and takes a very specific route every day, is incredibly valueable information if I want to photograph it with my high-end camera. The images from the TrailCam can be quite good, but it still won’t compare with a photograph made with a DSLR and a long lens from a photographic blind.
These cameras are great tools but take some getting used to before you are rewarded with good images. Realize that they work when the camera sees movement and therefore can be fooled by foliage blowing in the wind. Don’t expect miracles over night. Work with the camera and experiment with it in different locations, at different times of year and in different situations until you are getting successful images.
Once you master them, you will be rewarded time and time again.
Set the table for great garden photography with backyard wildlife studio
A backyard bird and wildlife studio combining food and water can be a magnet to attract a variety of birds and backyard wildlife and put them in a picturesque setting. Getting great photographs is easy, especially if you add a Tragopan Photographic blind to allow a close approach.
Create your own DIY backyard bird studio
How do you get great garden photography of backyard birds and other wildlife?
Capturing great images of birds and other wildlife begins with welcoming them into your yard by planting a natural landscape using native plants, shrubs and trees whenever possible.
Nothing, however, beats your own backyard wildlife photo studio designed to not only attract your favourite birds and wildlife species, but to put them into an environment conducive to great photography. Simple answer, provide a backyard dinner table where lunch is always being served. And, don’t forget to give your feathered friends and wildlife something to drink to go along with dinner. This need for birds and wildlife to obtain food and drink resulted in my latest backyard project – a combined food table and reflection pond.
My latest project combines a dinner table on one side with a small reflection pond on the other side to bring in the greatest variety of birds and wildlife. This combination makes action at the backyard photo studio hectic with activity at times, especially when you have fiesty red squirrels claiming the entire dinner table to themselves.
The combination allows me to photograph a woodpecker working a tree stump one minute, while a chipmunk gets a drink of water in a reflection pool less than a foot away.
What more can a backyard wildlife photographer ask for in life?

A blue jay visits the photo studio. Shot with a 300mm F4.5
Simple steps to building a compact, portable studio
Neither the wildlife table, nor the reflection pond take up much room. Both are designed to be portable and easily broken down.
The feeding table is nothing more than an old, black Ikea end table that was headed to the thrift store. The reflection pond (see my earlier story on how to build it a DIY reflection pond) is made from a simple rubber boot tray placed on an outdoor end table. Both, of course, are embellished with natural materials.

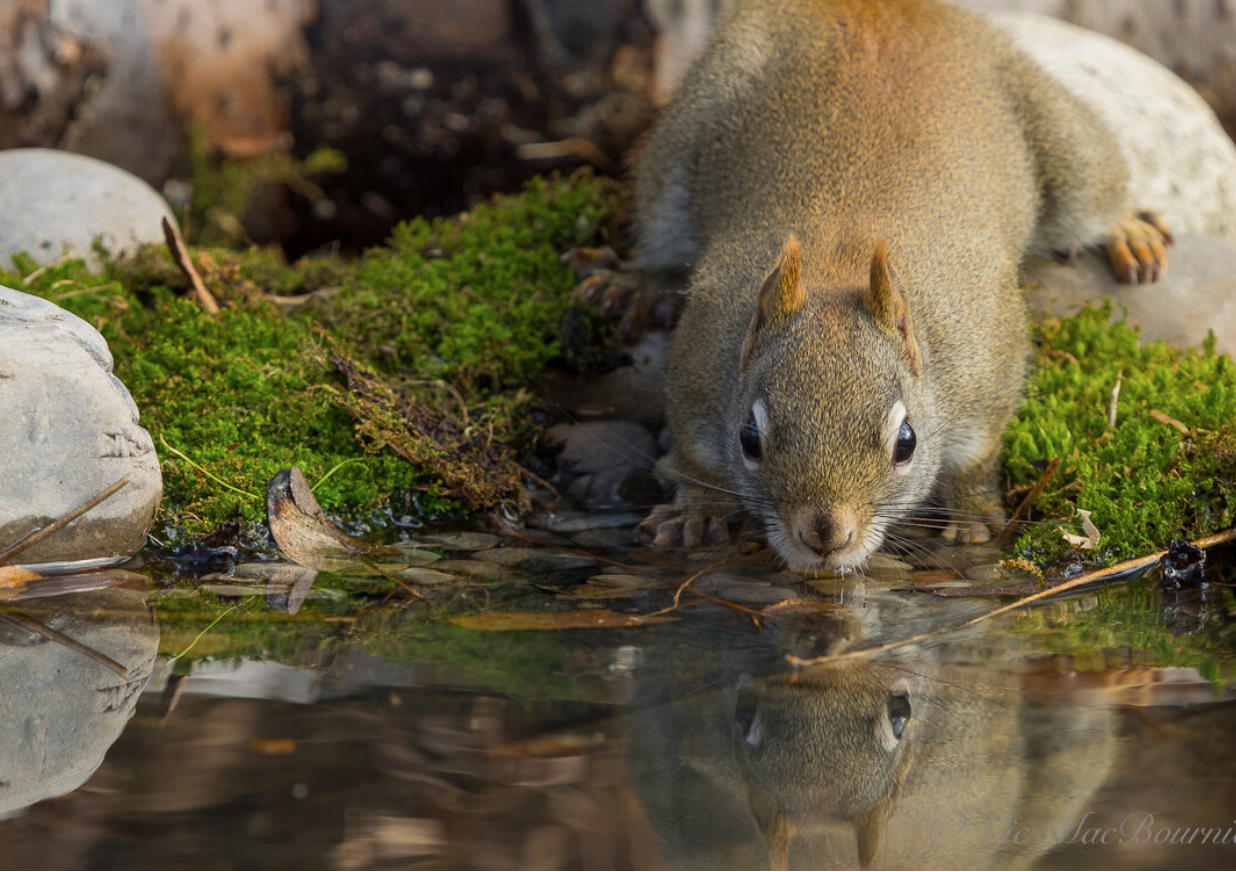
A red squirrel stops for a drink at the reflection pond.
Even with the two tables set up side-by-side, the whole studio takes up no more than 3-ft by 4-ft and is hidden away in the back of the yard near my bird feeding pole.
By placing the studio near the traditional bird feeding station (See my earlier story here), the wildlife is already familiar and comfortable feeding in the area.
(If you are interested in exploring garden photography at a higher level, be sure to check out my comprehensive post on the Best camera and lens for Garden Photography.)
If I could have only one lens for wildlife and birds in the garden, it would be my F* 300mm F4.5. Check out my full story on the lens by clicking the link.
I situated the wildlife studio so that it receives side lighting during the morning followed by front lighting into the afternoon and evening. I’m lucky to have a large, light grey shed (see my earlier story on the Keter Artisan shed) just a few feet from the studio that acts like a huge light reflector, especially in the morning light. The reflected light from the shed helps to soften the overall light that falls on the backyard studio.
Behind the studio, a small hill provides a natural backdrop of wildflowers and fall colours, but because the tables are only about 18 inches high, adding different background plants in pots is simple. In the past, I have used Northern Sea Oats from another area of the garden as a natural backdrop.
By experimenting with different natural elements either on the table tops or as a backdrop, the photographic combinations and possibilities are endless.

A combination of a feeding station on the left made out of an old Ikea end table is combined with a reflection pond made from a rubber boot tray on the right adds a lot of fun to backyard bird and wildlife photography. The natural materials were all found around the yard and can be replaced regularly to create different photographic possibilities.
Building a backyard studio
Building a backyard wildlife studio can be as simple as putting up a couple of bird feeders near a branch where the birds land on their way to the bird feeders, or as elaborate as designing the tabletop of natural props that allow you to photograph a variety of wildlife in different settings.
A moss-covered tree stump is perfect for hiding a handful of seeds. Add a mossy rock or two and provide a natural perch just above the tabletop to give birds a place to survey the dinner table before dropping down to feed. The natural elements can change regularly to keep the photography exciting and to ensure that not all the images have the same look.
if you are looking to upgrade your photography equipment, be it a new camera or lens, consider checking out KEH Camera Exchange. They offer a huge variety of used lenses and cameras to choose from and, you can trade in your old equipment to further reduce the already great prices.
Add seasonal elements as you find them. Acorns, pinecones, pine needles and colourful fall leaves are just a start. Cut some branches from your best berry-producing shrubs to add colour and a natural food source. I use a clamp that can be hidden to hold the branches in place. It helps to put the stems in a vase or water source to keep them from wilting too quickly.
The reflection pond uses many of the same natural elements and by using a black boot tray, the pond is literally made for you. An inch of water is all that is necessary to create the reflection, but the angle you photograph at plays an important part on how well the reflection works. The camera angle needs to be just above the level of the pond to get the best reflection.
I am experimenting with a small mirror under the water to give maximum reflective properties.
One of our resident red squirrels enjoys seeds set out in the crevices of the old logs that make up the feeding station half of the photo studio.
Tragopan photo blind brings it all together
Adding a Tragopan V6 photographic blind is really the final ingredient to successful bird and wildlife images. It allows a very close approach to both birds and wildlife in the garden, where wildlife is already familiar with human activity.
The photo blind is set up about 10 feet from the photo studio. This close approach lets me use a 300mm lens (420mm equivalent for cropped sensor) for a frame-filling image of birds and small wildlife. A simple 70-200mm lens works nicely as well.
The blind not only provides a certain comfort level for the birds and animals, it also keeps the photographer out of the elements – be it hot sun in summer, or the rain, snow and chilling winds of fall and winter.
By using a photographic blind, the need for expensive photographic lenses to get backyard images is reduced significantly. A consumer brand 70-200mm lens on a DSLR will get you high quality images. Even high quality travel camera (Lumix DSC50) or bridge camera (Pentax K5) which I am using will give you memorable images or video.
No photo blind, no problem
If you don’t have a photo blind you can still get great images, but you are going to have to work a little harder fot them.
Place a chair and a tripod where you want to sit to take your photographs and make it a habit to go out and sit there even if you are not taking pictures. The birds and wildlife will eventually get used to you being around and accept your presence. Even if they accept your presence, you need to move slowly at all times. That’s not always easy when a new bird lands just a few feet in front of you on your favourite perch.
What birds allow a close approach
There is no question that some birds allow a more close approach than others.
These are the birds you can often, with a little patience, encourage to eat right out of your hand.
These are also the birds that you are most likely photograph without the need of a photo blind.
I find chickadees, woodpeckers, nuthatches, blue jays and even Juncos to be quite approachable and accepting of photographers.
Cardinals are more elusive as are other backyard birds like Indigo buntings and, of course, raptors.
To capture images of these birds, a blind is more critical. Even with a blind, these birds can be skittish and fly off with even the slightest motion inside the blind.
In conclusion
A dedicated backyard bird and wildlife photo studio with a photographic blind may not be everyone’s cup of tea, but I guarantee that if you take a few moments to create this feeding station/reflection pond setup, you will be blessed with memorable images in no time.
It’s a great way to spend some time in the garden and put your camera to use on a weekend afternoon.
A word of caution. Don’t leave food on the table over night. Because it is low to the ground and there are no baffles or other deterrents to keep animals from feeding, it could be a magnet for unwanted visitors. I try to only put out enough food for the day. A handful or two of strategically placed food will go a long way and you can always replace it easily if the action at the studio is particularly busy.
My studio is set up right beside the shed and allows me to quickly refill the dinner table as necessary.
Happy shooting and please let me know if you build your own backyard studio. I would love to see some pictures.


Picture perfect garden photography with your smartphone
Smartphones are excellent choices for garden photographers. Here are tips and tricks on how to get the most out of your smartphone camera for woodland and wildlife photography and suggestions for accessories that help you take better pictures with your favourite smartphone.
Tips and tricks to get the most out of your smartphone camera
They say the best camera is the one in your hand, and let’s face it, these days the camera in your hand is almost always a smartphone.
Not only are the cameras in today’s smartphones excellent, but the ease of sharing your garden photographs from the smartphone directly to social media or email is just too simple in comparison to the effort needed to share photos from digital cameras.
With that in mind, this post is going to focus on using a smartphone to photograph your garden.
In other posts, I’ll explore the benefits of using 35mm digital cameras and high-end point and shoot cameras, both of which offer more control, quality and accessories to tackle garden and wildlife photography.
Photo accessories add versatility to smartphones
Accessories, however, are not restricted to 35mm digital cameras.
There are some great accessories available for smartphones that will help expand your creative vision and enable you to capture images you would never have been able to capture with just your phone. More on those later.
In addition, many of the free editing programs that are available for smartphones are outstanding and can lift your garden photography to new heights.

Taken with an smartphone and edited in Lightroom to saturate the colours.
The image of the Sun’s rays streaming through the trees in the early morning (above) was taken with my iPhone following a heavy overnight rain.
I took several photos, but when I looked at them closely, I realized the best photo was an image within an image. Even with a heavy crop and some editing in a Lightroom phone app, the image held together surprisingly well.
Again, it shows what you can do with a smartphone camera, good lighting and a little knowledge about basic photographic editing.

The early morning light filters through the woodland garden and allowed me to capture a fleeting moment with my iphone camera.
One of the features that set smartphones apart from traditional cameras is the AI (artificial intelligence) now incorporated into most smartphones. This AI makes getting the proper exposure and focus for most images almost foolproof.
Although the latest smartphones are excellent and getting better every year, they’re not perfect.
Not unlike regular digital cameras, they can be easily fooled by extreme lighting conditions.
The resulting photographs will likely either be overexposed or underexposed.

By pinching the smartphone and enlarging the image, it’s possible to get good closeups or macro images of flowers like this native lady slipper. Some newer phones even have special macro lenses built into the phones.
Higher-end cameras that shoot RAW files or produce larger file sizes can withstand heavy editing without digitally “falling apart.” The smartphone digital file, however, is relatively small and severely editing the photograph can make the image unusable for all but basic sharing on social media.
The trick, especially with a smartphone, is to get the proper exposure from the beginning. Getting the best exposure often requires adjusting the camera settings to create an over- or underexposed image.

Our front Japanese-inspired garden taken with a smartphone.
Tricks to get the most from your smartphone camera
I am currently using an iphone 8 so everything I’ll write here will pertain to that phone. Other makes and models, however, offer similar features.
If you have never overridden the camera in your smartphone, or didn’t even know you could, you might be surprised what you can do with the phone’s camera settings.
For starters, if you are focusing in close on a particular flower in your garden, you can ensure it is in focus by touching the camera screen where the flower is located. This is especially helpful if you are trying for a closeup image of the flower. A yellow square will then overlap the area you touched on the screen. That cameraphone will then focus on that specific area and adjust exposure.
The closer you get to the main subject, whether it is a flower or a fall leaf, the more important it is to use the macro feature on the phone.
Once you touch the screen and the yellow square appears over the flower, you will notice that there is a sun icon with a slider line above and below it. This control allows you to change the exposure of the image. By sliding the sun image up, you brighten the image. By sliding it down you underexpose or darken the image.
The results can be dramatic.
The feature is particularly useful if you are shooting into the sun.
The amount of light coming into the camera will tell it to darken the image, but if you like the airy “high-key effect” than you can use the slider (moving it up) to keep the image bright.
If you are photographing a sunset, you may want to use the slider to darken the image and saturate the colours in the sunset. To darken the image, you would move the slider down.
I’m noticing dark, moody images have become more popular on instagram to create a more “theatrical” look.
But don’t underestimate the beauty of “high-key images.” They can be a nice effect, especially with light-coloured, delicate flowers. To bring the whiteness or brightness back to your flower images, touch the sun and slowly bring your finger up the screen. Notice the whole image getting brighter.
I was recently trying to capture an image of our flowering dogwood flowers that were back lit by the sun. The image the smartphone gave me underexposed the flower's dramatically, but by using the above technique I was able to maintain the delicate, ethereal effect I wanted in the image.
On another day, my pink supertunias were highlighted by a sunbeam that just lit them up beautifully against our grey shed which was in total shade. The smartphone read the scene and overexposed the flowers. Only by dramatically underexposing the scene was I able to recreate the pink supertunias standing out so boldly against the grey shed.
Built-in motordrive in Smartphones
One last technique to pass along that you may not know about.
Imagine you are sitting in your favourite chair in the garden checking out your instagram when a pileated woodpecker lands on a nearby branch. You raise the phone and grab a quick shot. It doesn’t move, so you grab another shot and it’s gone. You get two shots but neither is very good. In both cases the woodpecker turned its head just as you took the picture.
Here’s the tip many don’t know about: Your smartphone has a motor drive built into it. While you got two shots in the short time the woodpecker was on the branch, by holding your finger on the button you may well have got 10-20-30 shots to choose from instead.
At least one of those shots will be the perfect shot.
Grab your smartphone and give it a try.
Use your smartphones’ built-in zoom
In addition to the above technique, I’m guessing most people know about the two-finger zoom feature on smartphones that allow you to zoom in digitally on your subject.
Quality certainly suffers when you use this feature and remember to hold the camera steady when you take the shot, but the zoom feature allows you to get closer to the bird in the tree or the fawn in the back of the garden.
Don’t expect to get the same results you would with a 600mm F4 lens, but zooming in closer can make a big difference in garden photography where birds, insects and mammals are often easier to get close to.
Accessory lenses add even more versatility
Another way to add more versatility to your smartphone lens is with smartphone lens accessories.
There are a host of clip-on lenses that turn your smartphone lens into a fisheye lens, macro lens or telephoto lens. Often they are available in a package incorporating several lenses.
Checkout smartphone accessories available at Amazon, here.
The prices vary depending on the package and the quality of lenses. If you use your smartphone as your primary camera, these lenses are certainly worth considering.
Some lens packaged even include a circular polarizer, which is probably the single most important filter a garden photographer will need. The polarizer, not unlike polarized sunglasses, cuts through glare and reflection from leaves and other reflective surfaces including water but not steel.
A careful search on Amazon shows there are many lens/filters packages that include polarizers as well as star, graduated sky filters and neutral density filters. It is probably best to focus on a high quality circular polarizing filter rather than any other type of filter.
Tripod accessories for smartphones
The accessories seem endless on Amazon. Tripods and tripod adapters are also numerous. And if you find yourself using a tripod regularly, which is a good idea, you can get a bluetooth shutter release so you can take the picture without touching the phone and adding shake to the image.
An alternative is to just set a 5-10 second timer on your phone as a hands-off alternative.
Photographing your Woodland garden has never been easier.
A cup of coffee in one hand, the smartphone in the other and a walk around the garden in the early morning is sure to reveal some beautiful images.
A glass of wine in one hand, the smartphone in the other and an early evening stroll through the garden is sure to reveal even more outstanding images.
In your own garden, it’s particularly convenient to take advantage of these ideal times to take outstanding images. It doesn’t always need to be images of flowers.
When the sun is low in the sky and the wind has died down the garden becomes a magical place and the light takes on a new warmth that makes for the best photographic opportunities.
Don’t let these times go to waste.
This page contains affiliate links. If you purchase a product through one of them, I will receive a commission (at no additional cost to you) I try to only endorse products I have either used, have complete confidence in, or have experience with the manufacturer.
Garden photography: How to use props to photograph backyard birds
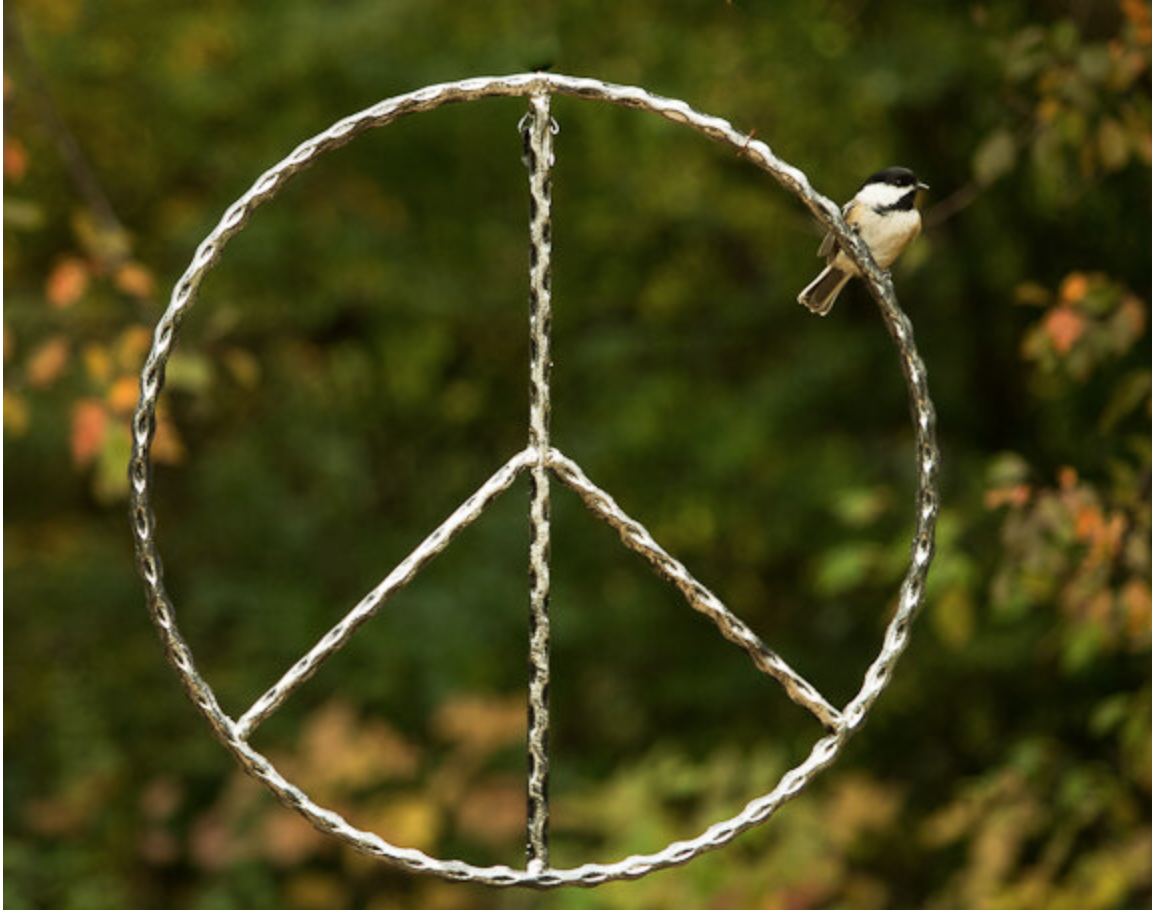
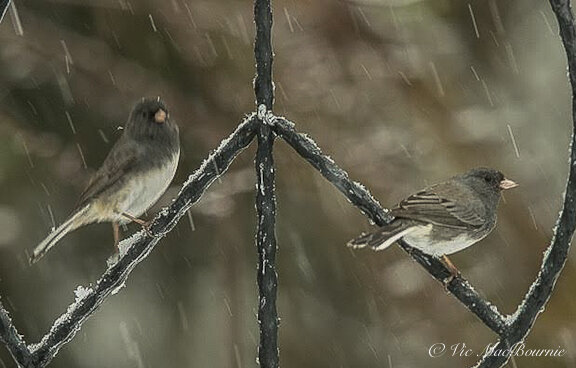
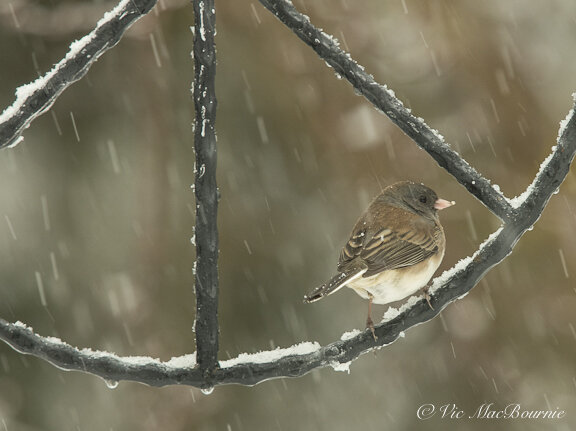
Capturing a little peace in the garden isn’t always about flower power. Try adding photographic props for birds to perch on to add a little whimsy to both your garden and your photographs. A peace sign is a “cool” prop that birds flock to like beatniks as free pot party.
Using garden props for backyard bird photography is a great way to add a little fun and whimsy to your garden photography and with the right props, the results might just “blow your mind.”
Cool peace sign prop for backyard bird photos
Flower power takes a back seat in this garden photography project.
All summer our focus has been on capturing the beauty of garden flowers, but that changes as fall approaches and we begin to focus more on birds and other areas of garden photography.
Fall is the perfect time to add a little fun to our photographic projects and using garden statuary, tools and even props can result in many memorable backyard bird images. While capturing a backyard bird in its natural environment is usually our ultimate goal, no one says we can’t have a little fun and create a backyard photo studio that includes using props much like a professional photographer would use to capture images of children, families and even our pets.
This wanna-be-hippie came up with an idea to combine a love of all things 1960s with a passion for birds, photography and gardening.
So what could be better than a metal peace sign – the “coolest” bird perch ever.
Even the birds are groovin’ it.
“If everyone demanded peace instead of another television set, then there would be peace.”
The peace sign is all part of my search for fun landing spots to photograph backyard birds. By placing props around the garden and near bird feeders, there is no end to the fun photographs available to us. Great bird photographs don’t have to reflect pure nature in our gardens.
If I could have only one lens for wildlife and birds in the garden, it would be my F* 300mm F4.5. Check out my full story on the lens by clicking the link.
Some of the best photographs I’ve seen celebrate the garden experience and welcome our forest friends to enjoy the garden – and its man-made ornaments – along with us.
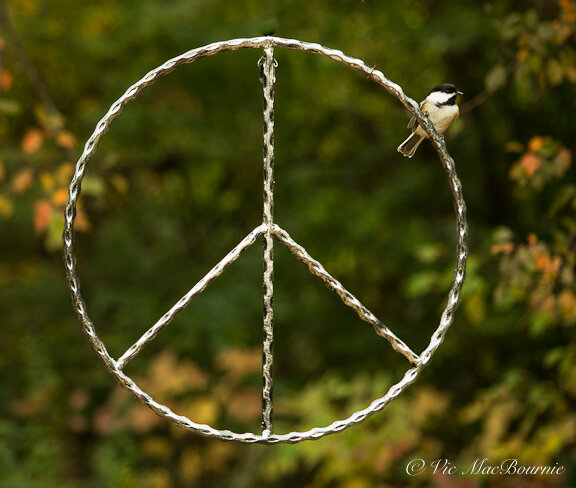
By moving in close the peace sign is still recognizable but the focus changes to the bird rather than the prop. A soft backyground adds to te simplicity of the image.
So it’s really a small step from photographing them on our existing garden tools, ornaments and patio accoutrements, to setting up fun props to catch them in entertaining poses.
“No one is free, even the birds are chained to the sky.”
The “Peace sign” just seemed too perfect to pass up.
A quick search on Amazon brought up the coolest “Peace sign” – the perfect landing spot for backyard birds waiting for their turn at the bird feeder.
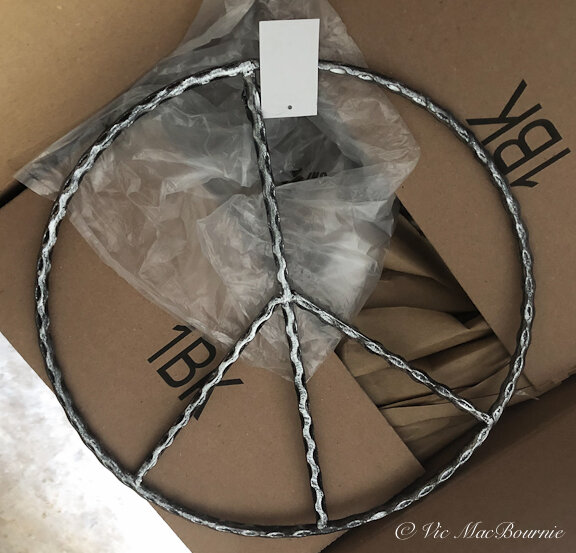
A couple days later and my Peace sign arrived all packed up and ready to become the latest perch for our backyard birds. After wrapping some copper wire around the perch to attach to the bird feeder pole, all that was left to do was to hang it and wait a few days so the birds can get acquainted to their cool new perch.
They took to it like beatniks would to free pot at a poetry reading party.
The peace sign perch is actually just one of many sprinkled throughout the garden.

This image was taken with a Fujifilm X10 equipped with a 28-112mm lens and shows what can be accomplished with a little planning. It helps to gain the trust of the wildlife in your garden. For more on the Fujifilm X10, go to my complete review here.
Setting up perches for an outdoor studio
It helps to keep the perches close to where you normally relax with your coffee and camera.
Eventually, one of our garden critters, whether it’s a backyard bird, chipmunk or friendly red squirrel, will explore the man-made garden perch. By keeping an eye on the spot, and watching how the light plays on the perch, it’s easy to capture it in the best light.
By hiding a handful of sunflower seeds on or near the perch, you can encourage the backyard models to the area much easier.

Most animals in our backyards like to get up high to keep an eye out for potential predators. I mounted this native bee and butterfly house on a pole and it didn’t take long for our local red squirrels to claim it as a lookout.
The simple grey background of the backyard shed helps the subject stand out and certainly does not hide the fact that the image was taken in a backyard. I was lucky enough to be in a photographic blind working the nearby feeder, when I noticed the squirrel watching me from the bee house. Although the Tragopan blind made getting the shot a little easier, these guys are friendly enough to photograph without a blind.
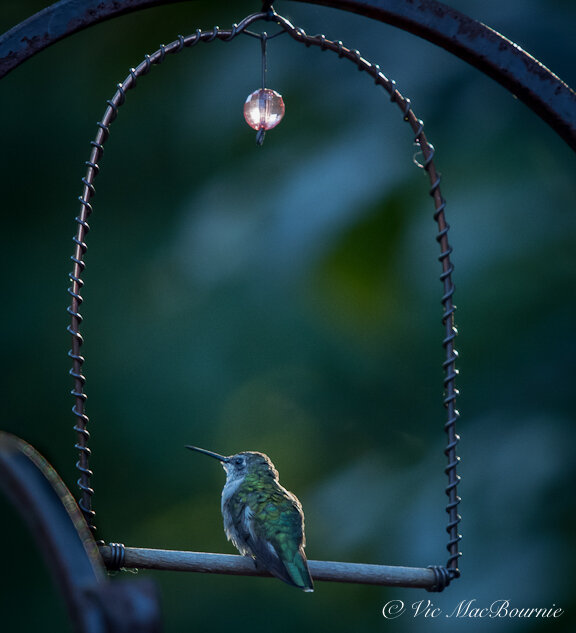
Focus on hummingbirds: Swinging in style
One of my favourite photography props is our elegant little hummingbird perch, a favourite spot for the local hummers to hang out.
I mount it just a few inches above a feeder where they like to perch and defend their food source.
Knowing that morning light creates a nice backlit situation made catching this rim light on the hummingbird as simple as setting up the tripod over several mornings until the bird landed in the perfect spot with just the right light.
If you are looking to upgrade your photography, consider checking out KEH Camera Exchange for excellent deals in used camera equipment from the latest camera bodies to a wide assortment of lenses.
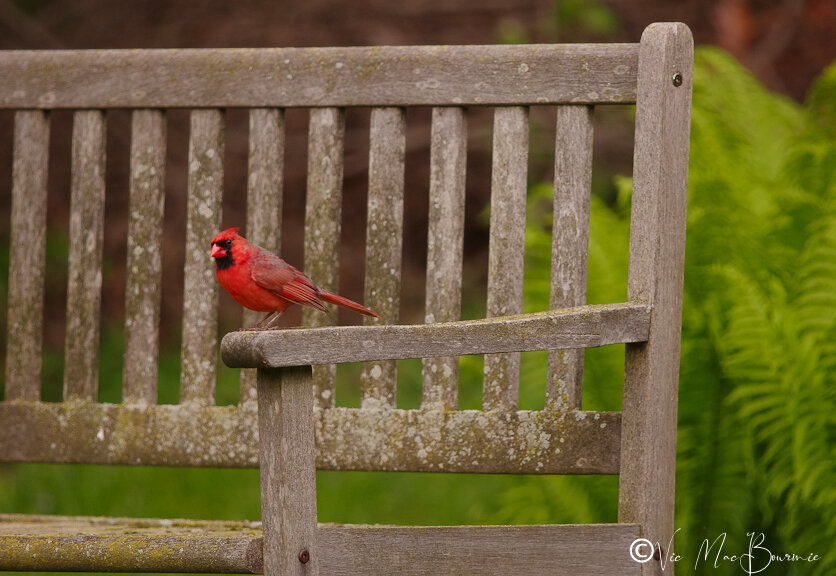
This Cardinal gives our garden bench the perfect pop of colour. There’s no need to move in close in this case, better to show the bird in its environment.
The garden bench makes the perfect prop
A garden bench is another excellent perch for backyard birds. Waiting for the male cardinal to get into the perfect spot took some patience but the pop of colour on the aged wooden bench makes for a classic garden photograph.
I decided it was best to stay back and not move in too close in this instance. Photographers often try to move in too close to birds, when a more environmental portrait actually works better.
In the image below, a closer approach seemed appropriate to catch the Chipmunk in the lovely evening light on the edge of the bench. The close approach was, at least in part, thanks to working from within my Tragopan Photographic blind. (For more on using the blind for backyard photography, check out my full report here.)

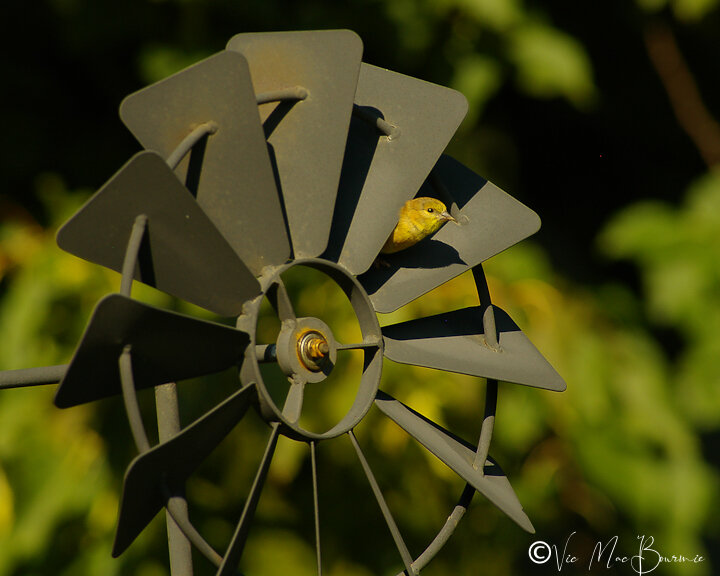
Goldfinch on windmill.
Catching the critical moment
It pays to have your camera by your side at all times in the garden. This little goldfinch was having a terrific time on the garden windmill. I was lucky enough to capture the image just when it popped its head out to have a look around.
Seconds later it was off to explore another part of the garden.
Chipmunk takes a quick break on garden ornament.
We’re are blessed in our yard with an abundance of curious chipmunks who never fail to amuse. This little guy was caught eating his lunch while I enjoyed a glass of wine on the nearby patio.
Garden photography: Build a portable DIY reflection pond in three simple steps
How to create a reflection pond in three simple steps. It begins with purchasing a rubberized boot tray. Then add some natural materials such as moss, river rock, pea gravel, pine needles and, in the fall, colourful leaves. The last step, add a little water and you are ready to start capturing professional looking reflection images of birds and mammals.
Create professional looking wildlife photographs
Ever wonder how photographers get those beautiful reflection shots of birds or animals?
It should come as no secret that many of those images are made with a well thought out reflection pond and a photographic blind.
In this post I am going to show you how to create a reflection pond in three simple steps and about ten minutes of your time.
I've always admired the incredible image of a lion drinking by the water hole in the evening – Its pink tongue and focused stare perfectly reflected in the water.
Without the mirror-like reflection, the image is just another impressive safari shot.
Our woodland and wildlife gardens can’t compete with an African watering hole, but that doesn’t mean we can’t create exciting reflection images in our own backyards. I know the red squirrel in the picture above isn’t quite a lion, but with a little work we can all imagine the possibilities.
Many of us have seen elaborate reflection ponds created to photograph birds and mammals. Some reflection ponds in Europe are so popular that photographers are willing to pay to use them to obtain outstanding photographic images of birds and mammals.
But here’s an epic hack of a readily available commercial product that makes creating a reflection pond as simple as possible and for under $50 Canadian. It’s so simple that, provided you have a few materials at hand, building it should take less than ten minutes.
(If saving money is your thing, check out my in-depth article on Building Your Garden on a Budget.)
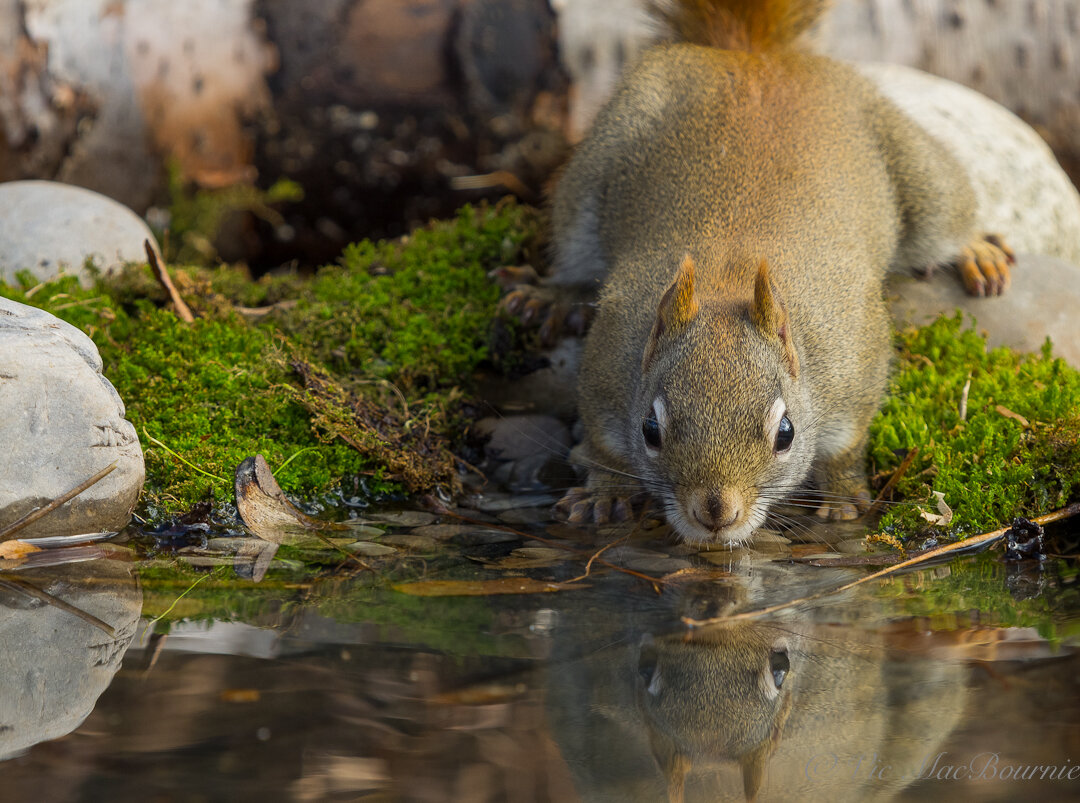
This reflection of a red squirrel at the pond is made to look natural with the addition of moss, pine needles, river rock and submerged pea gravel. This DIY reflection pond is extremely simple and inexpensive to create.
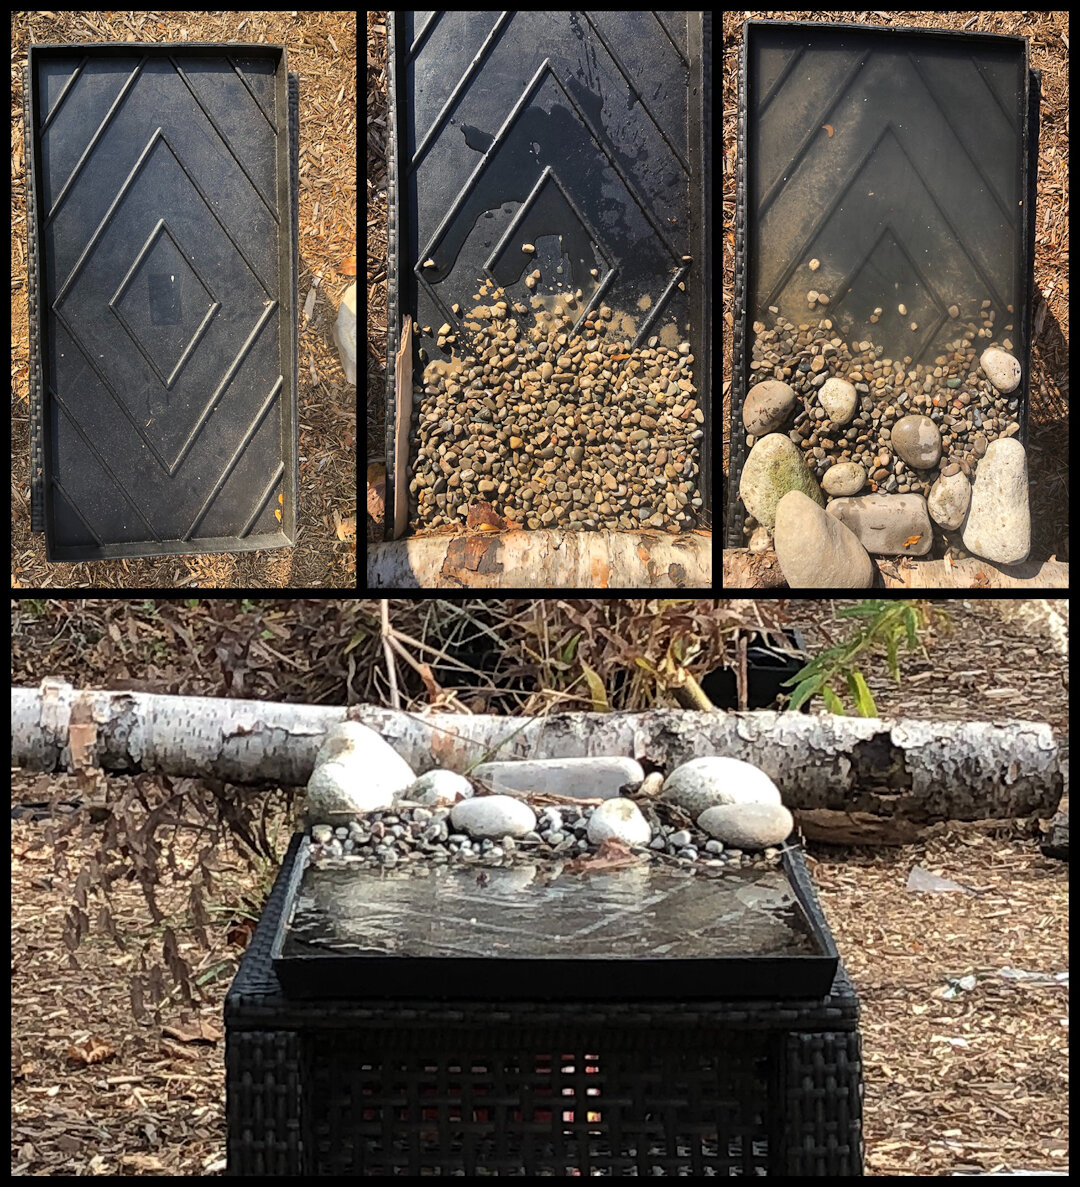
A step by step visual illustration of the creation of the reflection pond made from a rubberized boot tray.
Three simple steps to creating a reflection pond
1) Purchase a black rubberized boot tray. Mine was purchased from Lee Valley Tools outlet here in Canada and place it on a small table.
2) Add a few large river rocks, a couple of handfulls of pea gravel, maybe a birch log and moss, pine needles etc to your taste.
3) Add a couple pitchers of water to fill the tray and voila.
The reflected image of the red squirrel is just one example of what can be done with this simple, backyard reflection pond.
A little planning goes a long way in the creation of memorable backyard bird and mammal images. With that in mind, I went to work creating an outdoor studio to provide the inspiration to create my own “lion image.”
It's not uncommon for photographers to set up a few branches near a feeder as perches to guide birds to the best photographic locations.
My plan was to take that a step farther with the creation of a small reflecting pond to entice birds during the winter, when a reliable water source is a priority.
It all started with with the purchase of a 32-inch by 16-inch by 1.25-inch deep black rubber boot tray. It’s the perfect ready-made base to use as a reflection pond.
A robin stops by the reflection pond to steal a drink.
This boot tray, in case you are not familiar with it, is no cheap plastic flimsy tray that will crack in the cold. It’s made from a virtually indestructible rubber compound that is also non-skid and heavy enough to stay put even in high winds.
Placed on a similarly rectangular patio table that sits about two feet high, it's at the perfect height to capture reflections of the birds and mammals from my Tragopan V6 photographic blind or, if I put it close to a window in my home, from the comfort of my home.
Once I had the boot tray, the next step was to simply add some pea gravel, a couple of medium-sized and larger river rocks, maybe some pine needles, moss and a birch branch to give the outdoor photo studio a more natural look from behind the camera lens.
These natural materials will form the backdrop for the images and can be changed or manipulated to create different looks from one season to another. In summer, for example, moss and small wildflowers could be added. In fall, fallen leaves, pinecones, even an acorn or two.
Once the natural materials are in place, add a few pitchers of water to fill the tray to the top. Once the water is added, ensure that the tray is level by placing small stones or pieces of wood under the table’s legs.
Now, you are ready to begin photographing. It's really as simple as that. The birds will need time to get comfortable with the reflection pond.
During warmer months, you could slip a small mirror into the water to get a perfect reflection, but I don’t find that necessary. The fact the boot tray is black, will result in good to excellent reflection qualities provided your camera is set at the right angle to the water. A little experimentation here will help you get the results you want.
For the winter, set it up outside a back door on your deck or near a full-length window, so you can capture images in the comfort of your home.
With the Tragopan photography blind placed 7-10 feet from the reflection pond, I am able to use a very basic, inexpensive lens to capture the images.
By creating these types of lures to bring birds and mammals in close to either a photographic blind or a window in your home, you are much more likely to get outstanding images without having to purchase expensive photographic lenses.
It's important to note that to get a proper reflection, the camera should be at the same level or just above the height of the reflection pond. Some trial and error is necessary to get the best results.
I'll admit that the rubber boot tray falls a little short. It’s not perfect. If it were a little larger it would capture more of the reflection of larger birds or mammals, but it works beautifully for smaller- and mid-sized birds and mammals.
The fact it is black not only helps to create the perfect reflection, it also absorbs the light and works as a natural solar heater during the colder months. It will not keep it ice free in the coldest months, but it will help warm the water on sunny days.
My cost for the entire setup was about $40 Cdn, which was the cost of the boot tray.
In addition to the rectangular reflection pond, I also created a similar, smaller round version using a plastic planter tray purchased from a local nursery for about $11. That smaller pond is deeper so it allows me to use an electric birdbath heater to keep the small “pond” from freezing over.
For the winter, I have put both reflection ponds side by side in an area of the garden near a full-length glass door which allows me to photograph the birds and animals all winter from inside my home.
(I have taken the reflection pond to new heights by combining it with a natural backyard food table. Click on the link for the complete story about building a DIY feeding table/reflection pond photo studio.)
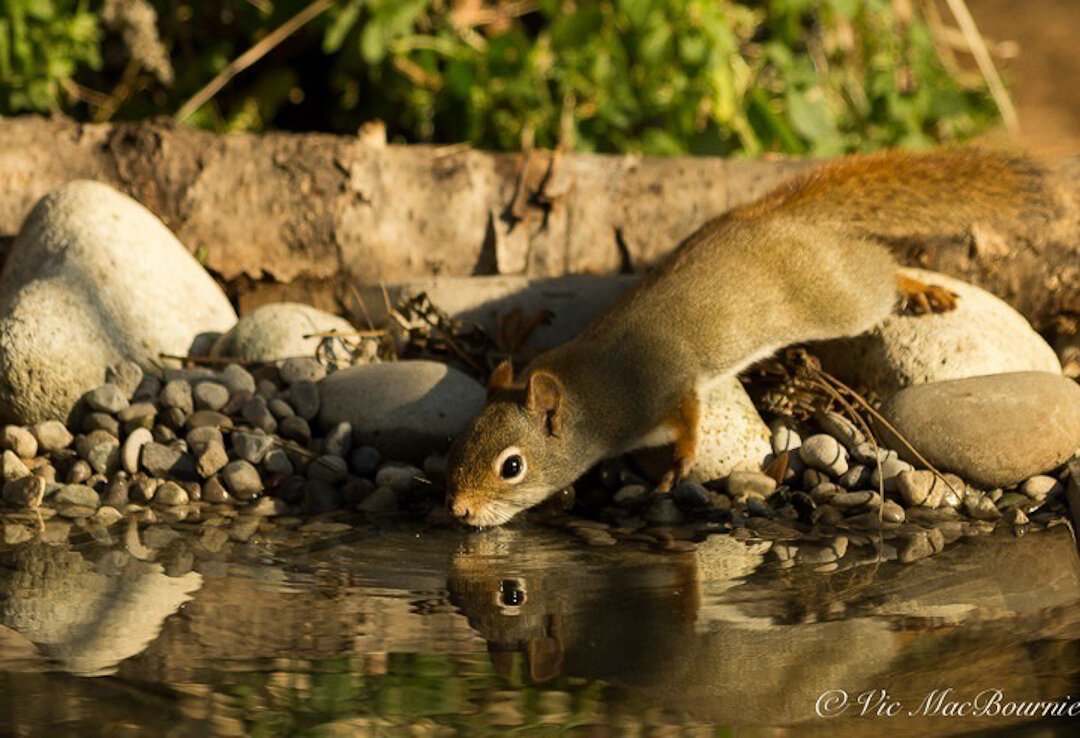
Another image of the red squirrel getting a sip of water from the reflection pond.
Tragopan Photographic blind is ideal companion to reflection pond
A note on using the one-man Tragopan V6 blind with this project. Besides working so well to hide my movements inside the blind, the viewing holes are set at the perfect height to photograph the best reflections.
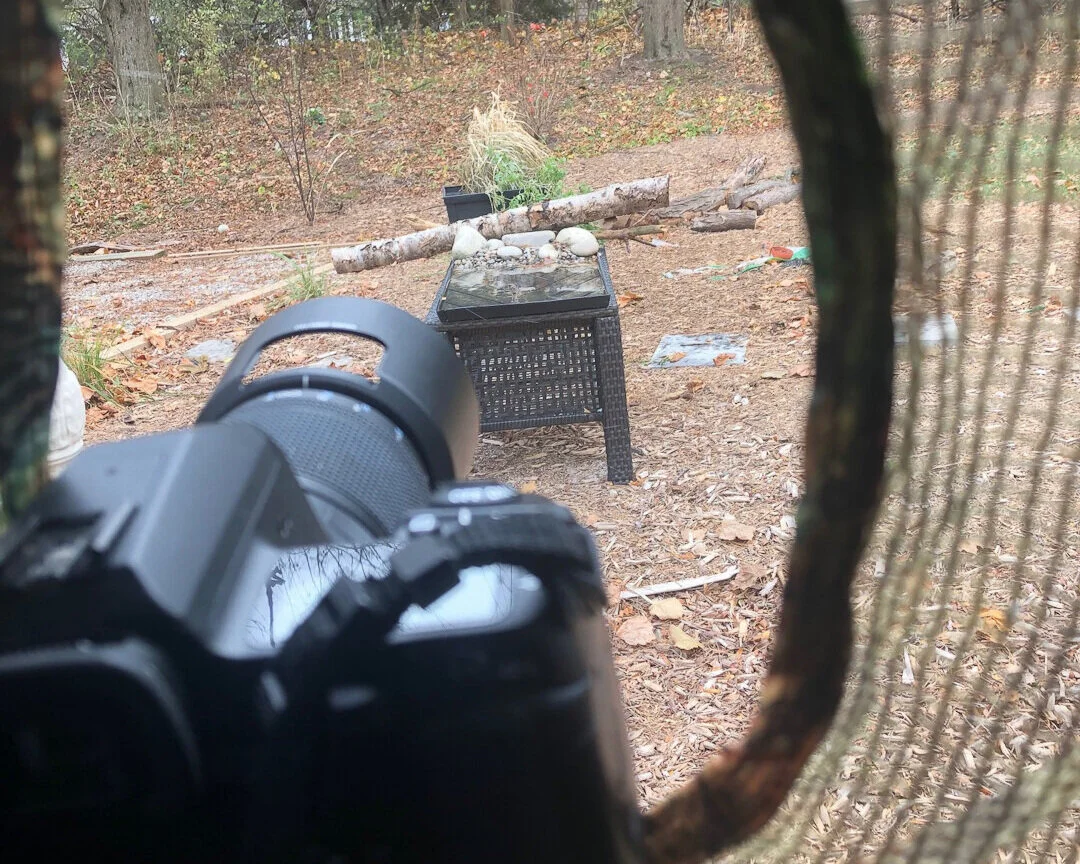
The reflection pond from inside the Tragopan V6 photographic blind.
In addition, both the blind and the reflection pond are extremely easy to move around the garden. By moving the blind around the garden, it’s possible to change backgrounds and even the reflections. For example, in the fall, move the reflection pond around the garden to capture the most intense fall colours. In the spring, do the same to capture spring flowering trees and shrubs.
I have used the blind extensively over the past several months and have grown to really appreciate the convenience of using it to capture images I would never have been able to get without it.
An added bonus to the blind is that as the weather turns cooler, the photo blind, that comes with a thermal lining built into it, will not only help cut the chilling winds and hold what little heat my body generates inside the blind.
The blind makes photographing during the cooler temperatures of late fall and early winter very comfortable for long periods of time.
Gardening on a budget links
Ten money-saving tips for the weekend gardener
DIY Bark Butter feeder for Woodpeckers
DIY reflection pond for photography
Click & Grow is ideal for Native Plants from seed